How to Add a JavaScript Module
April 07, 2021 | 10 min read
1. QuickRead
Magento 2 uses the requireJS as a tool to define the structure of the module. However, in addition, to require JS, Magento 2 also has its own special way to execute JavaScript code. You’re going to see this in the example we’re using.
We’re going to build a really simple JavaScript module that only gives the “HELLO WORLD” greeting. It demonstrates how Magento 2 operates with JavaScript files, executes code, and passes parameters within a script. The steps we’re going to have to take are:
- Build a new module.
- Build the requirejs-config.js and JavaScript module file.
- Build a layout update to add a template to the JavaScript module.
- Build a template file.
- Add the module and test it.
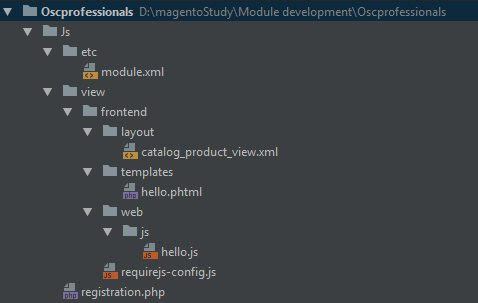
2. File Structure of Module
We’ve updated our File Module structure as follows:
3. Build a new module
We’ll build a new module called Oscprofessionals Js:
Now create two files:
app/code/Oscprofessionals/Js/registration.php
app/code/Oscprofessionals/Js/etc/module.xml
4. Build the requirejs-config.js and JavaScript module file.
Next, we’ll create a view folder:
Add the file app/code/Oscprofessionals/Js/view/frontend/requirejs-config.js:
Then add the JavaScript module:
And finally, add the file app/code/Oscprofessionals/Js/view/frontend/web/js/hello.js:
5. Build a layout update to add a template to the JavaScript module.
First, we need to create the layout folder:
And then add the file catalog_product_view.xml:
6. Build a template file
Now, we’ll create the template that will enable JavaScript.
In the templates directory, add the file
app/code/Oscprofessionals/Js/view/frontend/templates/hello.phtml:
This code is used to enable our module. It might look a little strange to those who used the requirejs before. As mentioned earlier, Magento 2 has its own unique JavaScript code execution process.
One way is to use the data-mage-initattribute that uses the JSON object as a parameter (as can be seen in this example). Each key of the object corresponds to the module, and the value is the config. In this case, the JavaScript module should return a function with two parameters: config and element. (This can be seen again in our example)
7. Add the module and test it
Finally, let’s add our module and test the result.
Now we’ll go to any product view page, and we should see the “HELLO WORLD!” message.


