 Skip to content
Table of Contents
- Introduction
- Why Go Multi-Brand on One Store?
- Key Components of a Multi-Brand Homepage
- Step-by-Step Guide to Creating a Multi-Brand Homepage
- Step 1: Creating a Custom Tab Section
- Step 2: Add Theme Settings with Schema
- Step 3: Styling Tabs with CSS
- Step 4: Building Alternate Homepage Templates
- Step 5: Switching Menus Dynamically
- Step 6: Integrate Section into Header
- Step 7: Unique Templates for Products and Collections
- Step 8: Final Output
- Quick Recap Checklist
- Pros and Cons
- Is This a Real “Multi-Store”?
- Conclusion
How to Create a Multi-Brand Homepage in Shopify Without Using Third-Party Apps
Having multiple brands on one Shopify store does not need separate Shopify accounts or any external applications. Your Shopify store can be set up with a single homepage that displays different brand views through an elegant navigation system.
Shopify users now have a full solution that employs no-code technology to create enterprise-wide homepage functionality which includes tabs navigation and separate templates and menus for brands while sustaining unified backend operations and checkout functions.
Why Go Multi-Brand on One Store?
Instead of juggling multiple Shopify stores (each requiring its own checkout settings, domain management, and admin access), this approach leverages a centralized system. This is particularly helpful when:
- Standardization of checkout procedures results in uniform efficient customer interactions between brands as well as it simplifies transactions and minimizes customer obstacles.
- The shared inventory system ensures perfect inventory management and minimizes storage costs as well as enables smooth customer fulfillment throughout all interconnected brand stores.
- The preference for unified analytics and CRM delivers combined customer insights while improving operational flow between all brands which leads to superior strategic decision-making capabilities.
- The goal to unite infrastructure elements with unified operational systems serves as the main approach to minimize both operational expenses and management complexity throughout the entire business structure.
Key Components of a Multi-Brand Homepage
To build a multi-brand Shopify UI, you’ll need:
- The development of a dynamic Liquid template section should enable administrators to manage and produce content inside user-friendly tabbed interfaces displayed throughout the website pages.
- The website uses schema settings which enable automatic brand name/header logo modifications. A theme schema must be implemented to allow administrators easy updates of brand names and logos throughout the website with automatic visual branding modifications.
- The system needs a conditional menu mechanism which outputs varied content based on chosen brand selections. Program logic should show unique navigation menu options based on what brand the system selects or the current user session connects to.
- Unique templates for each brand’s homepage, product, and collection, include separate Liquid templates that enable specific layout and style choices for every brand’s homepage along with product pages and collection listings.
- Specific CSS must be written to achieve interface consistency between pages with the additional requirement of element separation between brand-specific content.
Step-by-Step Guide to Creating a Multi-Brand Homepage
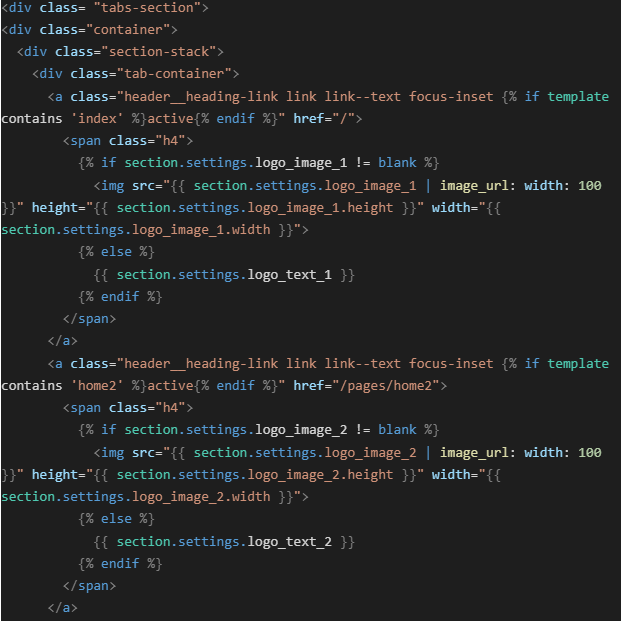
Step 1: Creating a Custom Tab Section
Navigate to Sections > Add a new file two-tabs-section.liquid.
Here is the full section code:
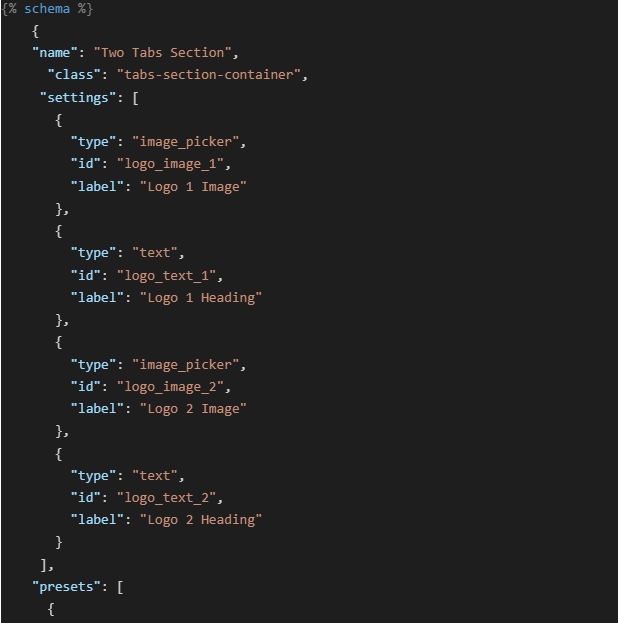
Step 2: Add Theme Settings with Schema
Add this right below the
closing tag of your Liquid code in the same file:
Step 2: Add Theme Settings with Schema
Add this right below the
closing tag of your Liquid code in the same file:

How It is Works:
- Users receive an uncomplicated visual method to move between brand homepages with this feature.
- Wearable items change their display between logos or labels following theme configuration updates.
- The switch functionality operates through Liquid template controlling mechanisms.
If not used:
- Users’ ability to detect perspective changes will decrease because they lack an immediate visual indicator leaving the clarity and navigation user experience diminished.
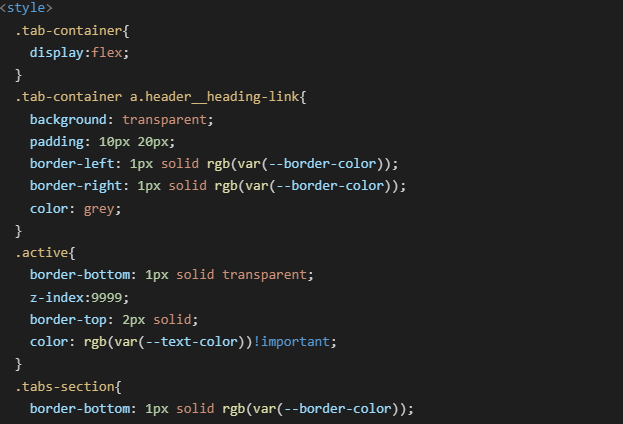
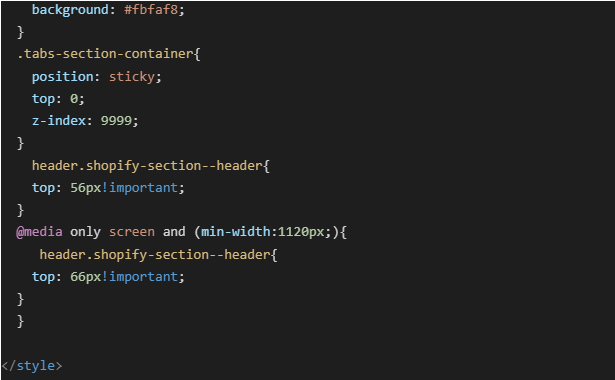
Step 3: Styling Tabs with CSS
CSS code in same file:
Advantages:
- Builds a clean, intuitive UI.
- This feature offers stable navigation alongside visual division that extends through all brands.
Without CSS:
- The tabs will appear with no visual variations.
- Bad UX and brand separation.
Step 4: Building Alternate Homepage Templates
- Go to Online Store > Themes > Edit Code
- Under Templates, click Add a new template → Select Page → Name it home2 → Format: JSON
- Assign this template to a new page in Shopify Admin named “Home2”
Why Do This:
- Users can establish separate design layouts for every brand they manage.
- You can implement complete choice management when it comes to banners together with featured collections.
Ready to launch your Shopify store? We will create a standout site with our development and optimization to build a store that sells.
Contact us now and get your store up and running fast!
Step 5: Switching Menus Dynamically
Embed this inside your header or navigation section
Pros:
Displays brand-appropriate categories and links.
Simpler, brand-specific navigation experience.
If Ignored:
More confusion may arise because the pages show an identical menu bar.
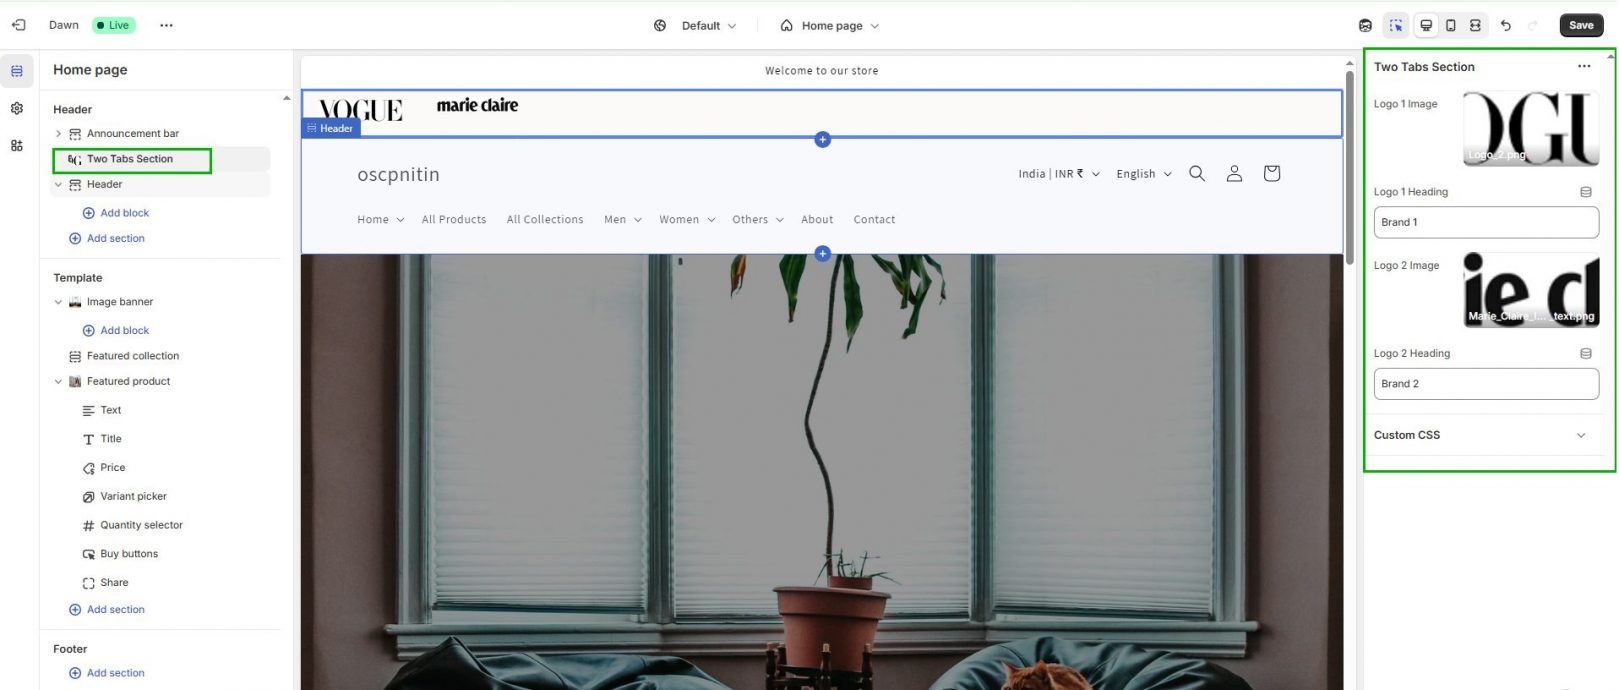
Step 6: Integrate Section into Header
Via theme customization, drag and drop the Two Tabs Section into the header layout. This ensures sticky tab visibility and intuitive brand switching.
Step 7: Unique Templates for Products and Collections
- Add templates: product.home2.json and collection.home2.json
- The administrator panel of Shopify enables users to assign Brand 2 products and collections.
This gives you control over:
- Product layouts
- CTA designs
- Upsells/cross-sells
- Descriptive formatting
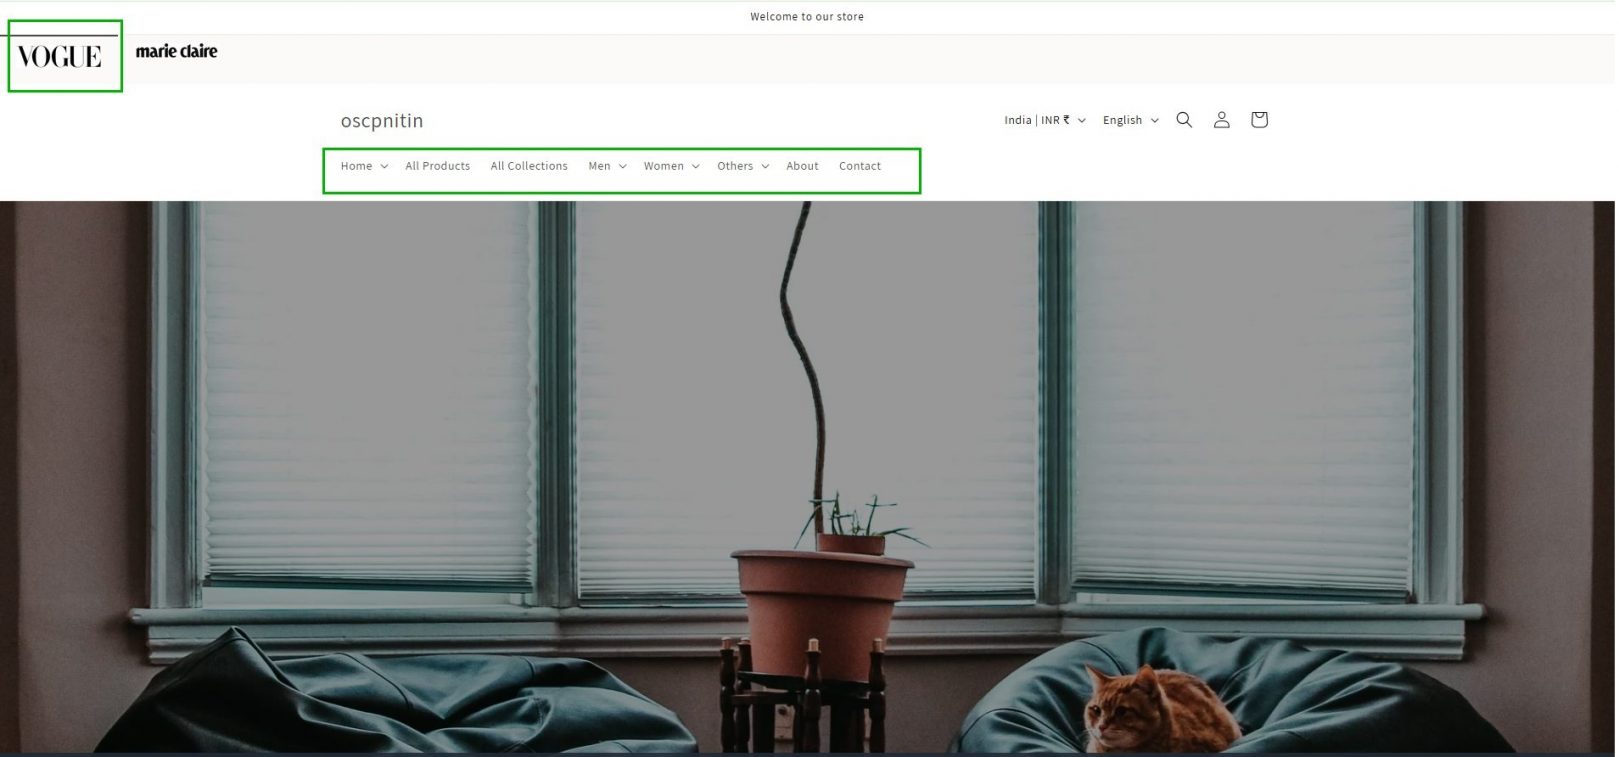
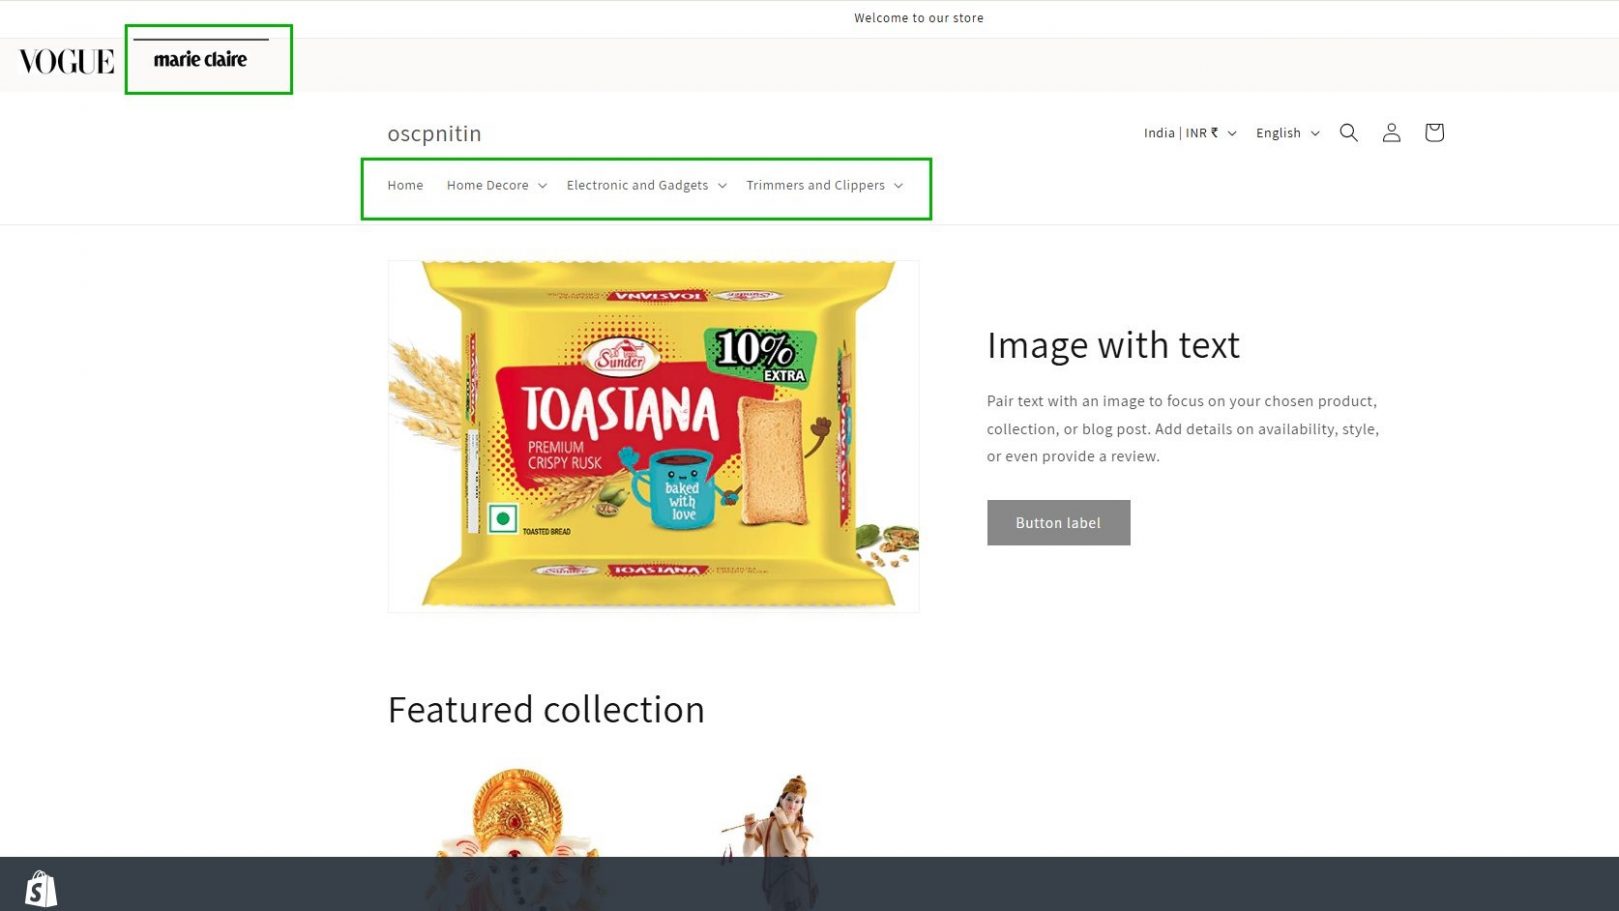
Step 8: Final Output
Brand 1 :
Brand 2 :
Quick Recap Checklist
- The custom Liquid tab section I designed allows users to collapse and expand content while improving section navigation through organized tabs. This enables better user experience by reducing visual clutter.
- The styling of tabs with CSS enabled their integration with the theme design for delivering a polished interface that helps users smoothly navigate between sections.
- The designer built alternative homepage templates which let different segments and brands choose their own branded pages and special content display to create unique introductory experiences for visitors.
- The system applies dynamically adapting menu options that adjust according to user activities or selected brands which presents relevant link choices throughout a site to improve overall visitor experience.
- The system contains separate templates for product details as well as collection display pages that present unique formatting options and content for distinct brand products and categories to enhance sales opportunities.
- Sticky user-interface elements appear as headers or call-to-actions which stay visible during scrolling to give constant access to main navigation and actions thereby enhancing the user experience.
Pros and Cons of Multi-Brand Homepage Strategy
Pros
- Tabbed UI makes it easy for users to move between brands through a system of swapping interfaces.
- Custom Menus: Clear, tailored navigation
- Brand-specific UX design with storytelling functions allow each brand to display its own interactive custom templates.
- The checkout process enabled users to combine merchandise from different brands into single purchases.
Cons If Skipped
- Confusing Navigation: Brands look too similar
- A generic experience occurred because the solution failed to designate individual personality traits for each brand.
- Users experience cart confusion because they fail to recognize the capability to combine products originating from various brands.
Is This a Real “Multi-Store”?
Not exactly. The user interface demonstrates store management through distinct views ran across the same Shopify system. It’s perfect if:
- You don’t need separate currencies/domains
- Unified checkout is acceptable
- You want easier backend management
If you need:
- Shopify Plus Expansion Stores provides the solution when separate domains, checkout processes and tax management for different regions are necessary.
Conclusion
Through advanced Liquid coding combined with Shopify’s available tools you can create multiple storefront appearances under one domain without needing external applications. Expanding brands can leverage this solution because it combines effective costs with scalable design and customizability for their digital centralization efforts.
Looking to scale your Shopify store with a multi-brand strategy without relying on apps or multiple stores? Our team can help you build a stunning, conversion-optimized, and brand-specific homepage experience tailored to your audience.
Get in touch with us today !!

