oscpimage
oscprofessionals logo
Shopify Wholesale App
Advance FAQ2024-09-19T08:22:55+00:00

Advance FAQ

Tired Pricing guide

Can I apply tiered pricing at collection level?2024-09-18T10:37:02+00:00

Yes, you can apply a discount at the collection level based on the customer tag.
Example: Products in “New collection” can be offered Tier Price – Buy 2 for 10% off and assign this to customers with Tag (VIP).

Can I apply tiered pricing at product level?2024-09-18T10:37:32+00:00

Yes, you can apply discounts at product level based on customer tags.
Example: Selected Products can be offered Tier Price – Buy 10 for 50% Off and assign to Wholesale customer Tag.

Can I apply tiered pricing for Product variants?2024-09-18T10:38:02+00:00

Yes, tiered pricing for Product variants is available with Customer Tags.

When placing a Order through Shopify’s admin, will the tier pricing apply?2024-09-18T10:38:37+00:00

As of now orders placed by Shopify Admin are not currently eligible for Tiered discounts.

Priority of the Offers

What if I have tier price at variant level, Product level and Collection level?2024-09-18T10:39:17+00:00

In this case Variant will have the highest priority over product and collection. That means the Tier price offered at variant level will be displayed on the Product Page.
Example: Offer 1: Buy 2 for 5% off – White Floral Top (Variant offer)
Offer 2: Buy 5 for 5% off – Floral Top (Product offer)
Offer 3: Buy 10 for 5% off – Tops collection (Collection offer)
Offer 1 will be applied as its Variant level offer which has highest priority.

What if a product is in two collections and both collections have different tier price rules?2024-09-18T10:40:15+00:00

The Collection with Offer which is displayed on Top in “List of Offers” will be applied. Then the next Collection Offer that is in the list will be applied.
Example: Silk Summer Top is in collection “New Collection” (Buy 2 for 5% Off) and “Clearance Sale” Collection (Buy 2 for 10% Off).
If “New Collection” is displayed first in “Offer List” then Silk Summer Top will display (Buy 2 for 5% Off) on the product page.
You can simply drag and drop “Clearance sale” on Top of the offer list and (Buy 2 for 10% Off) will be displayed on the Product page.

Offer is not visible for all variants, it’s visible only for one variant, why?2024-09-18T11:28:14+00:00

If there are two offers applied, one from Product and one from Variant tier pricing then Variant tier pricing will be displayed.

Product and Collection Page Integration
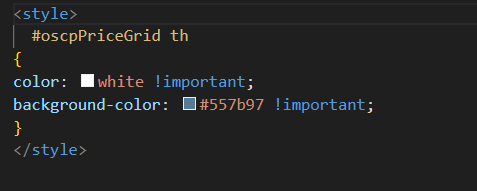
Does this App work with the BUY NOW button on the product page?2024-09-18T10:41:01+00:00

Yes, “BUY NOW” or “Buy it now” button is supported.

Can I showcase the discounted price next to the original price instead of using a pricing grid?2024-09-18T10:42:22+00:00

Yes, you have the option to showcase the discounted price for a single quantity and eliminate the price grid.

Is this app compatible with Payment Gateways?2024-09-18T10:43:16+00:00

As of now, the app does not support the other payment gateways but you can Contact us for customization.

Theme compatibility

To change color of discount grid on frontend?2024-09-18T10:44:25+00:00

Go to Sales Channel => Online Store => Edit Code => Assets => Theme CSS file
Add the below code at the bottom of .css file:
#oscpPriceGrid th
{
color: white !important;
background-color: #557b97 !important;
}

How to create offer for Product and its Variants based on Customer Tags?2024-09-18T10:46:15+00:00

On App Dashboard, Click on Tiered Pricing for Variants, New tab will open to select product, Select products and click on Add button, Here you can apply Wholesale pricing to each Variants based on Customer Tags

How to create offer for Products and Collections based on Customers Groups?2024-09-18T10:46:54+00:00

On App Dashboard, Click on Create Offer Tab Mention Offer Name, Offer Details (Wholesale Pricing) Apply discount to Selected Products or Selected Collections Assign discount to Customer Groups
1)All Customers
2)Logged in Customers
3)Customers with Specific Tags

The Discount Table is not reflecting on the Product Page?2024-09-18T10:47:41+00:00

1) Extension setup:
In Shopify admin, click Sales Channel => Online Store => Customization => App Embeds => Enable Custom Price Grid
2) Block Setup:
In Shopify admin, click Sales Channel => Online Store => Customization => In Home Page drop down select Products => Click on Default Product => In Product information click on Add block => In APPS click on Custom Price Grid => Drag and drop Custom Price Grid below Price (in Product information)
3)Check Dashboard if App is Enabled (ON)
4) The Offer / Discount created is Enabled (ON) On Offer List Page
5) If any other Price related App is installed, it may conflict with our App. So you can disable other pricing related Apps in order to view the Wholesale Table on the product page.

The Discount price is not reflecting on the Cart Page?2024-09-18T10:48:16+00:00

In Shopify admin, click Sales Channel => Online Store => Customization => App Embeds => Click on Wholesale Price
Enter element ID or Class of the following Input boxes

The Discount price is not reflecting in the Mini Cart?2024-09-18T10:48:57+00:00

In Shopify admin, click Sales Channel => Online Store => Customization => App Embeds => Click on Wholesale Price
Enter element ID or Class of the following Input boxes

The Discount price is not reflecting when I click on the “Checkout” button on cart page and Cart Drawer (Mini cart)?2024-09-18T10:49:30+00:00

In Shopify admin, click Sales Channel => Online Store => Customization => App Embeds => Click on Wholesale Price
Enter element ID or Class of the following Line Item:
For Checkout button on Cart Page and Cart Drawer
HTML reference for Checkout button on the Cart Page and Cart Drawer (ID or class) in Checkout Button input box

The Discount price is not reflecting when I click on the “Add to Cart” button?2024-09-18T10:52:30+00:00

In Shopify admin, click Sales Channel => Online Store => Customization => App Embeds => Click on Wholesale Price
Enter element ID or Class of the following Line Item:
For Add to Cart button
HTML reference for Add to cart button on the Product page (ID or class) in Add To Cart button input box

How can I display discounted price for single quantity on product page?2024-09-18T10:53:44+00:00

To avoid pricing grid on product page and directly display discounted price,
follow these steps:
Theme Setup (Left Navigation in App) => Select Theme (click on Continue) => App Block Setup => Click on Add Discounted Price => Move Discounted Price below default Price block => Disable Wholesale Price (Grid) => Save changes

Registration Form

How to create a registration form?2024-09-18T11:04:47+00:00

On the app’s left navigation, click on “Registration Form Setup” and then click on “Create New Form.” The registration form will appear.

Step 1 : Add Title & Description

Step 2 : Add Primary Contact Details
When you click the pencil icon to edit, you’ll see options for Label, Hint, and Validation. Here, you can modify the label, hint, and validation type so that they appear in the frontend form.

Step 3 : Add Business Details

  • You need to click on the right side section checkboxes provided in the business details.
  • Once clicked, it will allow you to add details for those particular fields.
  • You can rearrange the fields by clicking the up and down arrows.
  • When you click the pencil icon to edit, you’ll see options for Label, Hint, and Validation. Here, you can modify the label, hint, and validation type so that they appear in the frontend form.

Step 4 : Add More Details
In this section, you can add additional details with custom fields. You can select them according to your preferences.

How can I view a registration form on the frontend?2024-09-18T11:13:14+00:00

Step 1: Locate the Main menu in storefront

  • From the Shopify admin page, click to Online stores>Navigation
  • From the Navigation page, click Main menu

Step 2: Add the form to the menu in storefront

  • Once you are in Main menu, click on Add menu item
  • Add menu item popup will open in right hand side
  • Fill the name and add the link by punching in the Registration Form Setup. You can copy your Registration form link from here (Dashboard > Registration Form Setup). Now You can view the Registration Form in the Frontend menu section.
Why am I not receiving emails?2024-09-18T11:02:56+00:00

First you Need to configure Email Notification Setup. You need to follow the below steps.
On the app’s navigation, there’s a tab of Email Notification Setup to configure the emails notifying your customers of account approval.There’s configuration to notify you of new registration too.
In the Notification section, store owners can input their email addresses to receive all communications. Click on Configure Here we will provide three email templates

1.Customer’s Request Submitted Notification: When a customer submits their form, an email is automatically sent to them, informing them that “Your account is under review.”

2.Owner’s Request Received Notification: Likewise, an email is sent to the store owner, informing them that a potential customer has submitted the form along with the customer’s details.

3.Customer’s Approval Notification: Once the form has been reviewed and the store owner changes the customer’s status from pending to approved, another email is sent to the customer.

Go to Top