How to Create a Custom Module in Magento 2?
Hello Friends,
We will create a custom module in Magento 2 named “HelloWorld”, that will show output as “Hello World” to the content block using a custom frontend route. So we will create a module with Namespace “Oscprofessionals” and Module Name “HelloWorld”.
“Oscprofessionals_HelloWorld”
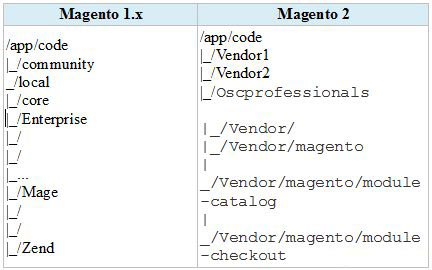
Before creating the first module, we have to understand the differences in directory structure between the Magento 2 version. In Magento 2, there are no longer any code pools (local, community, and core) in /app/code directory. Code pools are eliminated from the code-base file structure. Magento 2 only has /app/code/. And the modules are grouped by `Vendor`. So we will create module right inside the app/code directory.

/app/code/Oscprofessionals/HelloWorld
Let’s setup our basic custom module structure :
We will need three files at root of the module namely:
-
\app\code\Oscprofessionals\HelloWorld\composer.json
-
\app\code\Oscprofessionals\HelloWorld\registration.php
-
\app\code\Oscprofessionals\HelloWorld\etc\module.xml
Step 1: In the module root directory we’ll create a file named composer.json. Composer.json file describes the module.
The code structure look like this:
File: app\code\Oscprofessionals\HelloWorld\composer.json
{
 "name":
"oscprofessionals/helloworld",
   "description":
"A simple Magento 2 Hello World module.",
   "type":
"magento2-module",
   "version":
"0.5.3-stable",
   "license":
[
"OSL-3.0",
"AFL-3.0"
],
   "require":
{
       "php":
"~5.5.0|~5.6.0",
       "magento/magento-composer-installer":
"*"
},
   "extra":
{
       "map":
[
[
"*",
"Oscprofessionals/HelloWorld"
]
]
}}Here we see many elements. Lets explain each one of them.
“name” – The name element holds the Composer name by which we will refer to the module.
“description” – Optional description of module.
“type” – This defines our repo as a magento2-module, this is so when someone includes your module as a dependency on their Magento 2 install, composer will know what to do with it. And that brings us to the next bit.
“version” – The version element declares the version of this package.
“license” – License of your module.
“require” – The required element declares which other modules should be loaded and the version number we are compatible with.
“extra” – The extra/map element tells that all the code should go under the Oscprofessionals/HelloWorld directory, which is relative to the app/code directory when type is set to magento2-module.
Step 2: Next, we need a registration.php file in the root of our module. This is picked up by the Magento framework and will handle registering your module with Magento.
File: app\code\Oscprofessionals\HelloWorld\registration.php
Here we define our module name in module tag. Here we can define dependencies of our module. In our example we have defined dependency on the module Magento_catalog. It means our module must be loaded after Magento_Catalog module. In case this module is not available, our module will not be loaded.
Now with these files, we have registered our module.
Step 4: Next, we will create a custom routes for our module. For this purpose, we need to create a routes.xml at etc/frontend folder.
Here is our routes.xml :
File: app\code\Oscprofessionals\HelloWorld\etc\frontend\routes.xml
In this file we have defined our router that is of type “standard” and front name is “oscp”.
To register a router we need to add to this: ,
and if we wanted an admin router we do this: .
Next we define our route.
The id attribute is simply an identifier, it should be unique.
The frontName attribute is going to be the first part of the URL, in the complete example our URL is /oscp/helloworld/index
Step 5: With our route registered, now we can create our Controller action. This is something else that has changed in Magento 2 in comparison to 1.x in a fairly major way. Now, instead of specifying a controller class, which has multiple [actionName]Action() methods, you now have a class for each action, which implements a execute() method. Here is the code:
File name: app/code/Oscprofessionals/HelloWorld/Controller/HelloWorld/Index.php
refers to everything within thetag in the rendered HTML page. There is also awhere you can add blocks to the page such as adding CSS.
Here we have added our block to the content container, and set the template of our block to welcome.phtml.
Step 8: Lets create our template file :
File: app\code\Oscprofessionals\HelloWorld\view\frontend\templates\hello.phtml
This file contain simple text saying “Hello World.”.
Step 9: Active Oscprofessionals_ HelloWorld module
We have two ways to active Oscprofessionals_ HelloWorld module
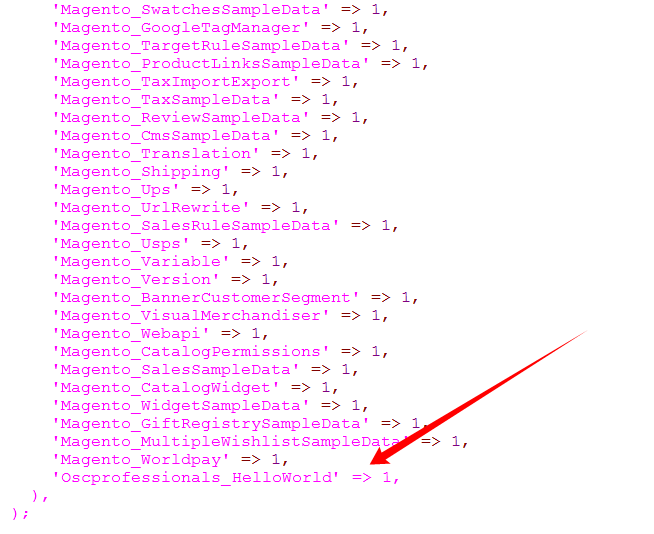
a. Directly edit file app/etc/config.php. In the array module, add the element:
‘
Oscprofessionals_ HelloWorld’ => 1,

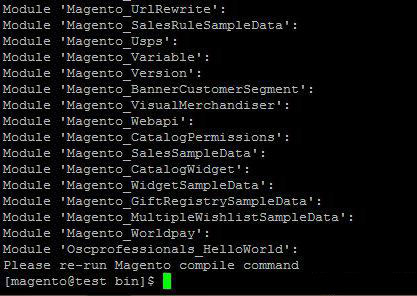
b. Open Command line in folder root of your magento2 and run commands for active module.
php bin/magento setup:upgrade
Here our First Custom Module for Magento 2 is been Completed.
For running our module, Please paste “oscp/helloworld/index” after your magento URL.

https://localhost/magento2/oscp/helloworld/index
This will look like this:

In our example, we have created an additional action class that will list all new products that is coming from a widget created in magento as default. For this purpose, we will create a new action as follows:
File: app\code\Oscprofessionals\HelloWorld\Controller\HelloWorld\NewProducts.php
Now when we append “oscp/helloworld/newproducts” in our url, we will get the list of new products.
https://localhost/magento2/oscp/helloworld/newproducts

I Hope this blog is helpful for you.
Thanks for reading.


