 Skip to content
March 10, 2021 | 10 min read
This tutorial applies to Magento 2.2.x only. For Magento 2.3.x, see Declarative
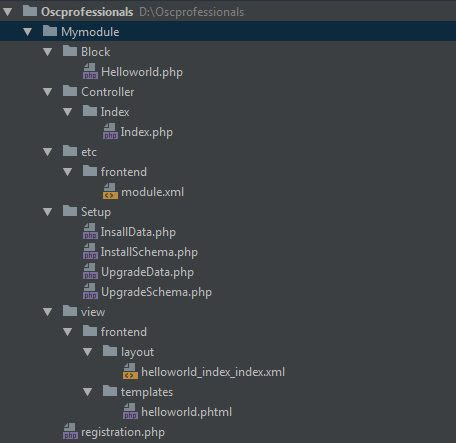
2. File Structure of Module
We’ve updated our File Module structure as follows:
3. Create file module.xml and registration.php
For the job of creating these 2 files, I have detailed instructions and explanations in the previous article. You can read it here.
4. Create file InstallSchema.php
You create this file according to the path: Oscprofessionals/Mymodule/Setup/InstallSchema.php.
We will create a table name magetop_blog with fields: id, title, description, created_at, status.
We will create a table name magetop_blog with fields: id, title, description, created_at, status.
use Magento\Framework\Setup\UpgradeSchemaInterface;
use Magento\Framework\Setup\ModuleContextInterface;
use Magento\Framework\Setup\SchemaSetupInterface;
class UpgradeSchema implements UpgradeSchemaInterface
use Magento\Framework\Setup\ModuleContextInterface;
use Magento\Framework\Setup\SchemaSetupInterface;
class UpgradeSchema implements UpgradeSchemaInterface
We will insert data for the oscp_blog_categories table.


Let’s Make Things Happen.
Unlock Your Online Growth Potential.
Information
Head Office
United Kingdom Office
Unit 4/Triangle Centre 399 Uxbridge Road,
Southall, Middlesex UB1 3EJ, UK
Southall, Middlesex UB1 3EJ, UK
UK : +44 07585311009
