 Skip to content
FAQ
Row-level discounts apply before shipping and tax are calculated. This ensures accurate tax calculations.
Yes, both discounts can be applied together. First, the row-level discount is calculated and applied. After that, if the order qualifies for the order-level discount based on the final amount, the order-level discount will also be applied.
To achieve this, you’ll need to create two separate offers — one for 10% off at $100 and another for 15% off at $500.
The discount will be recalculated. If the new cart subtotal is below the defined minimum value (e.g., $100), the discount will no longer apply.
Can the app differentiate discounts between selected products and non-selected products in the cart?
No, currently the app only provides the option to apply row-level discounts to all products in the cart.
If the minimum order value of $100 is met, each product row (worth $200) will receive a 10% discount.
Product A: $200 → $180
Product B: $200 → $180
Total discounted cart: $360
Row-Level: Applies % off each product row.
Order-Level: Applies % off on the final order total only once.
Currently, the rule applies the same percentage discount across all selected products in the cart when the condition is met.
Yes. Once the minimum threshold is met, the defined discount (e.g., 10%) applies eligible products row-wise in the cart.
A row-level discount means the discount is applied to each product line item in the cart individually, instead of applying a single discount on the overall order subtotal.
You can choose whether all conditions must be met or if any one condition triggers the limit.
Currently, order limits can only be applied to the entire cart, either based on the total quantity or the total order amount.
It helps manage inventory, prevent bulk order abuse, control shipping logistics, and improve overall order quality.
They will see an error message preventing checkout, such as “You must select at least X products.
- Total Quantity: Set minimum and maximum quantities per order.
- Total order value: Set minimum and maximum order amounts.
Yes! You can give each limit a label for easy management. This name is only visible to you, not customers.
Go to OSCP Wholesale B2B > Order Management > Order Limit and click Create Order Limit Rule. Then, set your conditions and save.
Order Limit lets you set minimum and maximum purchase limits based on product quantity or order value, helping you manage inventory and control large or bulk purchases.
Draw customers to your Shopify store by enhancing product listings with detailed descriptions, high-quality images, and targeted keywords. Utilize social media, email marketing, and SEO to connect with your audience. Additionally, offering promotions, loyalty programs, and exceptional customer service builds trust and encourages repeat business.
Navigating the health e-commerce space on Shopify requires a strategic, transparent, and legally compliant approach. By prioritizing consumer trust and responsibly addressing sensitive product concerns, merchants can build a successful and credible brand. These best practices protect your business and empower customers to make safe and informed decisions about their health.
Yes, Shopify can ban your store if you violate its policies or terms of service. This includes selling prohibited items, engaging in fraudulent activity, or failing to comply with legal regulations. To avoid penalties, merchants must follow Shopify’s guidelines and maintain ethical, transparent, and compliant business practices.
Yes, you can sell medical products on Shopify, but strict rules apply. Although Shopify allows the sale of a wide range of products, some items must comply with specific regulations and industry standards. Medical devices and equipment often require compliance with specific legal requirements to ensure safety, accuracy, and consumer protection.
Discounts stop working. Recreate the label and update rules.
If discounts aren’t applying as expected:
- Check: Products are in registered collection, customer group/quantity match rules, no conflicting rules, discount label exists.
- Contact support: apps@oscprofessionals.com or OSCP’s support portal.
- Yes, the OSCP Wholesale B2B app allows customization of the quantity selector and discount display to match your store’s theme.
- Adjust settings like colors and fonts in the app’s customization panel.
- For advanced styling, contact OSCP support.
Prices update dynamically on Product Detail Page, Cart, and Checkout based on cart quantity.
Adding/removing products auto-updates discount eligibility.
Yes, select customer groups (e.g., wholesale, VIP) in “Create Product Rule.”
The best discount tier from any collection applies (e.g., 20% from Collection A vs. 10% from Collection B).
Yes, register multiple collections; each collection’s quantity is calculated separately.
Yes, the best eligible discount will be automatically applied to the cart
Yes, manage rules under “Tier Price for Product Level” in the app.
On Product Detail Page (updates dynamically), Cart Page, and Checkout Page.
- Navigate to “Create Product Rule” in the app.
- Choose products/customer groups, set quantity ranges, discount type (fixed/percentage), and value.
- Add multiple tiers using “Add Price Rules.”
Only products in the registered collection(s) set in the app.
- Go to app Settings > Select “Quantity Clubbed Across Products of a Collection.“
- Register the collection(s) for discounts.
- Save settings.
- This feature allows you to apply tiered discounts based on the total quantity of all products purchased from a specific collection.
- For example, if a customer buys multiple products from a registered collection, the combined quantity determines the discount tier applied to each eligible product.
Use Case:
Discount Tiers Setup
| Product | QTY Threshold | Discount Value |
| P1 | 100 | 200 |
| P1 | 50 | 250 |
| P2 | 100 | 300 |
| P2 | 50 | 350 |
Customer Order
| Product | Quantity Ordered |
| P1 | 50 |
| P2 | 50 |
Applied Discounts
| Product | Applied Tier | Discount Value |
| P1 | 100 QTY | 200 |
| P2 | 100 QTY | 300 |
Total Clubbed Quantity: 100
Total Order Value: 500
It allows merchants to show both inclusive and exclusive tax prices on the pricing grid, based on the customer’s selected country.
You can enable the feature from the Settings page of the app by checking the “Enable Tax Display” option.
Yes, you can define country-specific tax rates. These will override the global rate if both are set.
The country-specific tax rate will take priority over the global rate.
Yes, the countries you assign tax rates to must have markets created in your Shopify admin.
Once the country is selected on the frontend, customers will see both inclusive and exclusive prices in the product page pricing grid.
No, the Tax Display feature is for display purposes only on the product pricing grid. The actual tax charged at checkout depends on your Shopify tax settings.
Currently, tax display settings are applied globally across the storefront and not on a per-product basis.
The USA-specific offer will take priority for customers located in the USA. The “All Markets” offer will apply only to customers outside the USA.
If two offers target the same market, only one will apply — typically the one with the best price.
No, the “All Markets” offer is a fallback that applies to all customers unless a specific market offer is defined for them. To exclude a market, create a specific offer for that market.
You can simulate a customer checkout using a test address from the desired country or use a VPN and guest checkout to observe how the system applies offers.
A market-based offer is a discount or promotion that applies to customers in a specific market or country, allowing for region-specific pricing or promotions.
Yes, you can create multiple offers targeting different specific markets. Each customer will only receive the offer that matches their market, with the most specific market offer taking precedence.
In that case, the “All Markets” offer will be applied as a fallback.
No, only one offer will apply based on market priority. If multiple offers are available, the most specific market offer takes precedence over broader ones like “All Markets.
Yes. You can create separate offers for each country or market. For example, one offer can apply to Canada with a 10% discount, while another can apply to Germany with a €5 fixed discount.
No, only one cart discount can be active at a time.
The discount will appear on the cart page and at the checkout.
Click on the Disable button from the Cart Discount section in the app.
Go to the App Dashboard → Click on Cart Discount → Click on Create Discounts → Fill in the form → Click Save
Yes. While creating a cart discount, you can define multiple tiers by entering different minimum values and corresponding discount amounts.
This is not supported by default. However, we are working on implementing customer tags based discount logic in future updates.
This functionality is not available currently, but it’s on our roadmap for future releases.
Add products to your cart that meet the discount conditions and check on the cart page and checkout page. You should see the discount automatically applied.
Yes, if a product variant has tiered pricing rules configured, those rules will also be displayed in the Quick Order Form. This helps customers see quantity-based pricing directly while placing their orders.
The product will not show if the SKU is invalid, you have to enter the correct SKU.
Yes. Entering the SKU of a specific variant will ensure that exact variant is added to the cart.
At the moment, you can manually enter SKUs one by one. For bulk upload or CSV import functionality, please connect with us at apps@oscprofessionals.com.
Yes. The store admin can customize colors, borders, and other visual elements to match your store’s theme.
You can access it via a direct URL or from the website’s navigation menu (if added).
The Quick Order Form allows customers to quickly add multiple products to their cart by entering product SKUs, eliminating the need to browse individual product pages.
Yes, you can. To update only specific product variants, follow these steps:
- Export the variant-level CSV from the app.
- In the exported CSV:
Add new rules for specific variants while keeping the existing rules unchanged. - Import the updated CSV back into the app.
- Check the variant metafields in Shopify to confirm that the updates have been applied.
- Export the CSV again to verify that your newly added or updated rules are correctly reflected.
This process ensures your updates are applied accurately without affecting unrelated product variant data.
Yes, It is possible to use a public theme which exists on the Shopify Theme Store. Launching a product duplicate from the Text Editor or duplicating branding elements such as logos or content or custom scripts stays forbidden.
When the theme value equals null it indicates that the store utilizes unique store design which does not appear in the official Shopify theme marketplace. Shopify experts along with in-house developers create most themes that appear on the market.
The copying of someone else’s Shopify theme is not possible due to copyright restrictions.
Not exactly. You can locate the Shopify theme in use and acquire its purchase through the Shopify Theme Store (if available for purchase). The practice of copying code or brand assets without proper authorization may trigger intellectual property right infringements.
If the price grid is not showing, it’s likely due to customizations in your theme or because you’re using a commercial theme.
We recommend checking whether the discount is being applied correctly by viewing the cart page. If the pricing rules are visible and working in the cart and at checkout, the issue is most likely related to your theme’s product page layout or custom code interfering with the app’s display.
Yes, you can include pricing rules in your CSV for each variant. This can be done by defining the price for each variant in the relevant column.
To edit an an existing Variant Rule in bulk:
- First, export the CSV file to get the sample data, then edit the details you want to modify.
- Then go to the app dashboard and click on the import button.
- Then you can upload your edited csv file.
Follow the below steps to export metafields from a CSV file
- On the dashboard, you need to first set your email ID in the email notification setup to receive the CSV file.
- Navigate to the app dashboard.
- Click on the “Export” button.
- A message will pop up indicating that the CSV file is in progress.
- Once the process is complete, you will receive a message confirming that the CSV file has been sent to your email address.
- You can then download the exported CSV file from your email.
Currently, the CSV file allows importing blank or zero (0) values in the Quantity field. However, we will implement restrictions for this in an upcoming release to ensure proper validation.
Currently, the import function does not work with case-sensitive customer tags.
Only lowercase tags are allowed, such as:
- all
- loggedin
- ovd_wholesale
It is best practice to allow up to two decimal places, as Shopify’s default settings also permit only two decimal points for product prices.
Yes, special characters are allowed in Customer, Product Title, Variant Name, and Variant SKU. However, in the current version, special characters are not supported in the file name. This functionality will be available in an upcoming release.
While Shopify doesn’t offer a native “disable” option for apps, our app provides an internal setting to deactivate its features. If you encounter any issues or wish to pause the app’s functionalities temporarily, please use the “Disable” option within the app’s settings. This will halt all features without affecting your existing configurations or data.
The Export Variant Rule feature allows users to set specific rules for exporting product variants based on criteria such as region, currency, or other custom attributes.
Yes! Metaobjects can be used for various custom data applications like product specifications, FAQs, and additional product attributes.
After setting up the Metaobject and assigning entries, check the Metaobject Entries Reference Section in the product page and ensure it displays the correct data.
Currently, Shopify does not provide a built-in bulk upload feature for Metaobjects. However, third-party apps or Shopify’s API can be used for bulk management.
Ensure that:
- The Metaobject entries are correctly assigned.
- The product metafield references the correct Metaobject.
- The changes are saved and synced properly in Shopify.
You can assign multiple products by selecting them under the Associated Products field when creating Metaobject entries.
Yes, you can edit a Metaobject to modify fields and entries. However, be cautious when deleting a Metaobject, as it may impact any linked metafields or products.
Adding a prefix like OSC helps in easily identifying and organizing metaobjects within Shopify, especially when managing multiple custom data entries.
A Metaobject in Shopify is a structured data entity that allows you to store additional custom information related to products, collections, or other store elements.
Yes, you can edit or reset a pricing template anytime.
No, the app only modifies pricing based on the templates you configure. Existing product prices remain unchanged unless updated through the app.
Yes, you can copy a pricing template to multiple product variants to quickly apply tier pricing.
You can set a global margin, which will apply to all products unless a product-level margin is specified.
Yes, you can set different pricing for each variant by applying a unique pricing template or modifying the margin at the product level.
If a pricing template is updated, all product variants using that template will automatically reflect the changes.
Yes, you can copy an existing pricing template to other product variants to apply the same tier pricing structure.
Margins can be applied at two levels:
- Global Level: A margin is set for all products.
- Product Level: A margin is set for specific product variants (this takes priority over the global margin).
A pricing template consists of:
- Quantity ranges
- Product cost parameters
- Margin settings
Yes, store owners can either create a custom pricing template or use a predefined one.
Tier pricing enables store owners to define quantity-based pricing for product variants. A pricing template is used to set quantity breaks and cost parameters, and then margins are applied to determine final prices.
The OSCP Add-On Tier Pricing app allows store owners to set fixed prices for product variants based on quantity ranges. It helps in managing B2B pricing by applying custom margins at both the global and product levels.
- If you need quick compliance, use Shopify accessibility apps like UserWay or EqualWeb.
- If you want full compliance, opt for custom accessibility development.
- Conduct regular audits to ensure ongoing compliance.
- Stay updated with legal deadlines to avoid penalties.
For further consultation on implementing accessibility in Shopify, consider hiring an accessibility consultant or reaching out to Shopify experts specializing in compliance, such as OSC Professionals.
The Web Content Accessibility Guidelines (WCAG) are based on four key principles:
- Perceivable – Content should be presented in ways users can perceive, such as providing text alternatives and making content adaptable.
- Operable – Users should be able to navigate and interact with the website using various input methods, including keyboards and assistive technologies.
- Understandable – Content and user interface elements should be clear, readable, and predictable.
- Robust – The website should be compatible with different browsers, devices, and assistive technologies.
To make your website WCAG 2.1 compliant, follow these best practices:
- Provide Text Alternatives – Add descriptive alt text for images and other non-text content.
- Ensure Keyboard Accessibility – Ensure that all functionalities can be accessed via a keyboard.
- Improve Color Contrast – Maintain a contrast ratio of at least 4.5:1 for text and background.
- Add Captions and Transcripts – Provide captions for videos and transcripts for audio content.
- Enhance Focus Indicators – Ensure visible focus indicators for keyboard navigation.
- Avoid Time-based Restrictions – Give users enough time to read and interact with content.
- Support Responsive and Mobile Accessibility – Ensure the website works seamlessly on different screen sizes and devices.
Regular accessibility audits and testing with tools like WAVE, Axe, and Lighthouse can help ensure compliance.
WCAG 2.0 AA standards are a set of guidelines established by the World Wide Web Consortium (W3C) to improve web accessibility. Level AA compliance ensures that content is perceivable, operable, understandable, and robust for users with disabilities.
WCAG 2.1 Level AA standards are web accessibility guidelines designed to make digital content more accessible to people with disabilities, including those with visual, auditory, cognitive, and motor impairments.
While Shopify doesn’t offer a native “disable” option for apps, our app provides an internal setting to deactivate its features. If you encounter any issues or wish to pause the app’s functionalities temporarily, please use the “Disable” option within the app’s settings. This will halt all features without affecting your existing configurations or data.
No, our app is currently not compatible with the Shopify POS app.
No, our app is currently not compatible with the Shopify POS app.
If the price grid is not displayed on the product page, it may be due to customizations made to the product page. In this case, please check the cart page to see if the pricing rules are applied there and on the checkout page. If the rules are working on the cart page, the issue is likely due to the customizations on the product page.
You can add up to 10 collections in a single offer. If you need to apply rules to more than 10 collections, you will need to create a separate offer.
Yes, you can include pricing rules in your CSV for each variant. This can be done by defining the price for each variant in the relevant column.
To edit an an existing Variant Rule in bulk:
- First, export the CSV file to get the sample data, then edit the details you want to modify.
- Then go to the app dashboard and click on the import button.
- Then you can upload your edited csv file.
Follow the below steps to export metafields from a CSV file
- On the dashboard, you need to first set your email ID in the email notification setup to receive the CSV file.
- Navigate to the app dashboard.
- Click on the “Export” button.
- A message will pop up indicating that the CSV file is in progress.
- Once the process is complete, you will receive a message confirming that the CSV file has been sent to your email address.
- You can then download the exported CSV file from your email.
Yes, we are considering adding variant pricing in a future release.
Yes, customers can select their preferred variant before adding the recommended product to their cart.
No, not at this time. The displayed price is based on the default product price, regardless of the selected variant.
Yes, customers can select different product variants from the recommended items before adding them to their cart.
Currently, our app does not support multi-currency functionality. You can contact us for any custom requirement.
YouStable, with highest 99.9% guaranteed uptime, NVMe SSD servers, AMD EPYC CPU and pre-installed MT4 and MT5 trading platforms, offers the best Forex VPS hosting services for low-latency trading. Moreover, YouStable also offers powerful servers with low-latency connections to global Forex markets, ensuring faster order execution and reduced delays.
Forex VPS hosting offers high levels of security, including data encryption, application firewalls and regular backups. It ensures that your trading data is protected from potential cyber threats including hacking and data loss.
Yes, Forex VPS hosting is 100% compatible with trading platforms like MetaTrader 4 and MetaTrader 5. It ensures that these trading platforms run smoothly 24/7, providing you with amazing trading experiences and latest trading trends.
Absolutely Yes! Forex VPS hosting is perfect for automated trading. It allows trading bots and trading advisors to operate without the need for your local computer to be on. The VPS ensures that the automated systems execute trades with minimal latency, even when your PC is turned off.
Yes, Forex VPS hosting reduces the risk of downtime and connectivity issues. It offers the best internet connection, 99.9% highest uptime and faster response times, ensuring that your trading strategies run smoothly without interruptions.
Forex VPS hosting refers to virtual servers specifically designed for the Forex traders. It provides an amazingly fast and secure environment for running automated trading strategies, trading bots and Forex platforms like MT4 and MT5. The server is accessible 24/7, offering uninterrupted network connectivity, ensuring your trades are executed on time.
Viewbotting isn’t always illegal, but it is banned by Twitch’s terms of service. Breaking these rules can lead to account suspension or other penalties. It’s best to grow your channel honestly to avoid any trouble.
Signs of botting include repetitive chat, usernames that look fake, and little engagement with the streamer. Real viewers interact naturally, while bots often appear robotic or out of place.
You can check for low chat activity, odd usernames, or sudden spikes in viewers. For example, if a stream has 1,000 viewers but very few messages, it might have bots. Always look for multiple signs to be sure.
Yes, tools like Twitch viewbot checkers can help identify suspicious activity. These tools analyze streams for patterns, such as low engagement or bot-like usernames. This makes it easier to spot fake viewers.
Twitch uses advanced tools and algorithms to spot fake viewers. These systems monitor streams for unusual activity, like big spikes in viewers with no engagement. When bots are detected, Twitch removes them to keep streams fair.
Yes, bots can target innocent streamers and make their channel seem suspicious. This might confuse viewers or cause problems with Twitch. Luckily, Twitch understands this and usually doesn’t punish the affected streamer.
No, not all sudden spikes mean viewbotting. Events like raids, shoutouts, or trending content can also bring many viewers at once. It’s important to check for other signs before assuming bots are involved.
If Twitch detects viewbotting, the channel can be banned or suspended. This is because viewbotting breaks Twitch’s rules about fair play. Twitch wants to create an honest and equal platform for all streamers.
- Check your internet connection.
- Switch to a different server in the VPN’s settings.
- Ensure both the VPN extension and your browser are updated to the latest versions.
A slight reduction in speed is possible due to encryption, but high-quality VPNs optimize performance to minimize any noticeable lag.
Yes, reputable VPNs like X-VPN, ExpressVPN, and NordVPN are safe to use. They offer robust encryption and strict privacy policies to protect your data.
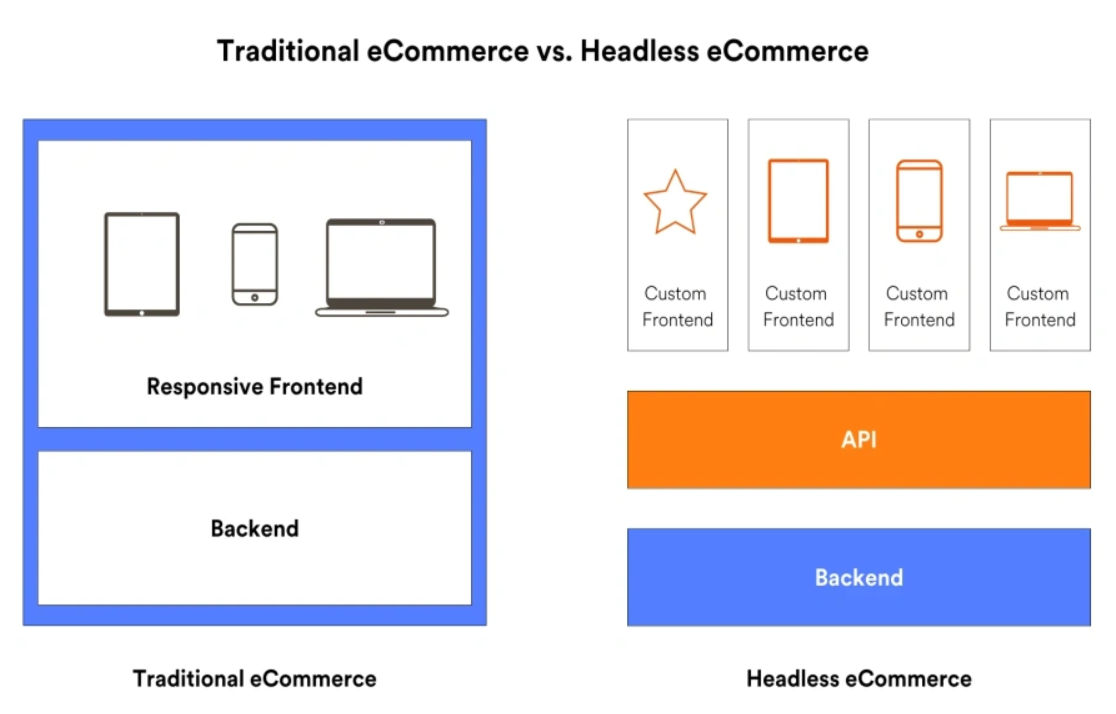
Headless commerce separates the front-end from the back-end, focusing on flexibility for user interfaces. Composable commerce takes it further by letting businesses integrate multiple specialized tools (like payment processors or CRMs) into a modular system, offering more customization and control over the eCommerce stack.
Yes, headless commerce typically requires developers to set up and manage the front-end and back-end integrations through APIs. However, some platforms, like Shopify Plus, offer tools and templates that reduce the workload, allowing for non-technical teams to manage certain aspects.
Headless commerce separates the front-end and back-end, while traditional commerce keeps them tightly connected. This makes headless more flexible and scalable for innovative businesses, while traditional commerce is simpler and better suited for smaller businesses with basic needs.
Not every store needs headless commerce. Small businesses or startups with simple requirements might benefit more from traditional platforms due to lower costs and complexity.
Headless commerce is best for businesses that need flexibility or custom features like multi-channel inventory management, personalized shopping experiences, or advanced API-driven analytics.
No, headless CMS focuses on managing and delivering content (like blogs or product descriptions) across platforms. Headless commerce goes further, integrating eCommerce functionalities like inventory management, payments, and APIs, creating a complete shopping ecosystem. They can work together for a unified experience.
Currently, shipping discounts cannot be applied to specific customers. However, in future releases, the app will support applying shipping discounts to individual customers.
You can choose to apply the discount to all shipping methods or a specific shipping method.
To apply it to a specific method, simply enter the exact name of the shipping method and press Enter.
Yes, you can apply a shipping discount to multiple shipping methods. To do this, simply enter the exact names of the shipping methods and press enter. You can add more than one specific shipping method as needed.
Shipping discounts typically do not apply to digital products since there are no shipping costs involved. However, you can create discounts for customers purchasing both digital and physical products.
Yes, you can create tiered shipping discounts where the discount amount varies depending on the cart value.
For example, you could offer $5 off for orders over $50 and free shipping for orders over $100.
Shipping discounts generally do not affect tax calculations. Taxes are usually calculated based on the subtotal of the items purchased, not including discounts or shipping costs.
Shipping discounts can be applied to international orders, depending on the rules you set up. You may want to adjust rates based on the destination to account for higher shipping costs.
Yes, you can create time-sensitive shipping discount offers by setting a start and end date. This can be useful for seasonal promotions or flash sales.
Shipping discounts can often be combined with other promotions
To create a shipping discount offer, click on the Shipping Discounts section in the Discount Rules app navigation. Then, fill in all the required details to create your offer.
Set the condition to “Product” containing selected products. Then, apply a 100% percent discount for free shipping.
Set the cart condition to “Total Amount” ≥ 100 USD, then apply a 100% percent discount for free shipping.
When you select a product and choose a condition “contains” then it will apply the shipping discount & When you select a product and choose a condition “contains all” then it will not apply the shipping discount.
Use Case :
Scenario 1: “Contains” Condition
- You have 3 products in the cart: Product A, Product B, and Product C.
- You set a free shipping discount with the condition “Product contains Product A.“
- When the customer adds Product A to the cart, the free shipping discount is applied, regardless of the other products in the cart.
Scenario 2: “Contains All” Condition
- You have 3 products in the cart: Product A, Product B, and Product C.
- You set a free shipping discount with the condition “Product contains all Product A, Product B.“
In this case, the free shipping discount will not apply unless both Product A and Product B are in the cart. If Product C is added or if Product A or Product B is missing, the discount will not trigger.
1. Shopify Discounts and Stackable Coupon Codes: If a Shopify coupon code or default discount is applied, it will not combine with a stackable coupon code. Only the Shopify coupon code will be used in this case.
2. App Discounts and Stackable Coupon Codes: When using discounts created through our app, a stackable coupon code can be combined with these app-level discounts for additional savings.
Yes, stackable coupon codes can be used with tier discounts at both the product and variant levels to maximize savings.
Stackable coupon codes can generally be applied to multiple types of discounts. As of now, tier discounts at both the product and variant levels allow the use of stackable coupon codes.
Yes, stackable coupon codes can be combined with free shipping discounts, allowing customers to maximize their savings by applying both types of discounts at checkout.
If you have a stackable coupon code, you need to enter it at checkout to receive additional savings.
As of now, only one coupon code can be used at a time.
A stackable coupon code is a type of promotional code that can be combined with other codes during checkout to provide additional discounts or benefits.
Yes, you can include pricing rules in your CSV for each variant. This can be done by defining the price for each variant in the relevant column.
To edit an an existing Variant Rule in bulk:
- First, export the CSV file to get the sample data, then edit the details you want to modify.
- Then go to the app dashboard and click on the import button.
- Then you can upload your edited csv file.
Follow the below steps to import metafields from a CSV file
1. On the dashboard, you need to first set your email ID in the email notification setup to receive the CSV file.
2. Get sample csv data by exporting csv file first then fill the below details
- Product Id
- Product Title
- Variant ID
- Variant Title
- Variant SKU
- Variant Price
- Customer Tag
- Currency Code
- Unique Rule Identifier
- Offer Quantity
- Offer Type
- Offer Value
3. Then go to app dashboard and click on import button
4. Then you can upload your csv file.
Note: You should apply a maximum of 20 rules for the variant, and ensure that the entries in the ‘Unique Rule Identifier’ column are not repetitive. Each identifier must be unique, for example: rule1, rule2, rule3.
Follow the below steps to export metafields from a CSV file
- On the dashboard, you need to first set your email ID in the email notification setup to receive the CSV file.
- Navigate to the app dashboard.
- Click on the “Export” button.
- A message will pop up indicating that the CSV file is in progress.
- Once the process is complete, you will receive a message confirming that the CSV file has been sent to your email address.
- You can then download the exported CSV file from your email.
The Import Variant Rule feature allows you to upload a set of predefined rules via CSV to manage product variants discounted rules. This simplifies and automates variant management across large datasets.
- Hyva is a “headless-ready” theme, meaning it can decouple the frontend presentation layer from the Magento backend.
- It uses a modern technology stack including Vue.js, Tailwind CSS, and Webpack for improved developer experience.
- Hyva is designed to be highly customizable, with a focus on developer productivity and flexibility.
- Other Magento themes may rely more on the traditional Magento templating system, whereas Hyva embraces more modern frontend approaches.
- Fast page load times and improved performance
- Responsive and mobile-friendly design out of the box
- Customizable and extendable with Tailwind CSS
- Seamless integration with Magento 2 features and extensions
- Reduced development time and costs compared to building a custom theme
- Hyva is a modern, headless-ready theme for Magento 2 that provides a fast and responsive user experience.
- It is built on top of the Tailwind CSS utility framework, offering a flexible and extensible design system.
- Hyva is designed to work seamlessly with Magento’s powerful ecommerce capabilities.
Typical implementation takes 48 weeks depending on…
Hyva is a modern Magento 2 theme that drastically improves store performance…
The time taken to develop a Shopify app depends on your unique needs and the expertise of your Shopify developer. It is better to ask about an estimated time when availing Shopify app development Services for a more absolute answer. Typically, it can take up to a month.
We provide the following Shopify services:
- Shopify Customization: Tailor your store’s design and functionality to fit your brand and business needs.
- Shopify Optimization: Enhance your store’s speed, performance, and SEO for better user experience and higher rankings.
- Shopify App Development: Create apps to add unique features and functionality to your store.
- Shopify Migration: Seamless transfer of data from other platforms to Shopify, ensuring minimal downtime and no data loss.
These services help optimize and scale your Shopify store efficiently.
A mobile app is solely for the mobile platform, whereas Shopify app development can be for desktop or mobile.
Shopify offers two main types of apps: private and public. Private apps are tailored to your specific business needs, offering full customization and the ability to address unique requirements for your store. Public apps, available in the Shopify App Store, can be used by other e-commerce stores and typically require a subscription. Examples of popular public apps include Oberlo for product imports, Privy for email capture, and Klaviyo for email marketing.
Shipping discounts typically do not apply to digital products since there are no shipping costs involved. However, you can create discounts for customers purchasing both digital and physical products.
Shipping discounts generally do not affect tax calculations. Taxes are usually calculated based on the subtotal of the items purchased, not including discounts or shipping costs.
Shipping discounts can be applied to international orders, depending on the rules you set up. You may want to adjust rates based on the destination to account for higher shipping costs.
Yes, you can create time-sensitive shipping discount offers by setting a start and end date. This can be useful for seasonal promotions or flash sales.
No, In future releases, our app will support applying shipping discounts to specific customers!
Yes, you can apply a shipping discount to multiple shipping methods. To do this, simply enter the exact names of the shipping methods and press enter. You can add more than one specific shipping method as needed.
Yes, you can create tiered shipping discounts where the discount amount varies depending on the cart value.
For example, you could offer $5 off for orders over $50 and free shipping for orders over $100.
Shipping discounts can often be combined with other promotions
When creating a discount offer, you can choose from several shipping method options. You can either apply the discount to All Shipping Methods or select a specific shipping method. To apply the discount to a specific method, simply enter the exact name of the shipping method and press enter.
To create a shipping discount offer, click on the Shipping Discounts section in the Discount Rules app navigation. Then, fill in all the required details to create your offer.
Public apps are adjustable but may not be fully customized.
Most public apps are constantly updated and come with some form of customer support.
Private apps don’t have subscription fees but have development and maintenance costs.
Go to Shopify Admin, Click on Apps, and then Manage private apps to create one.
Public apps are available for all the Shopify stores and can be easily installed from the Shopify app store whereas private apps are custom-made for the store.
Inventory for the FBT Bundle will be managed by tracking individual products in real-time, adjusting based on bundle sales and available stock.
No, there’s no limit. You can create as many bundles as you like, offering different combinations and discounts for your customers.
If a product is out of stock, customers won’t be able to purchase a full bundle, but they can still buy other available items individually.
Yes, it is possible to change the price of existing bundle products on the admin product page.
Yes, once customers add the required products to their cart, the bundle discount will be automatically applied at checkout.
Yes, each bundle can have its own discount, depending on the products you include and the promotion you want to run.
Yes, customers can purchase individual products, but they will not receive the bundle discount unless they buy the entire bundle.
Yes, you can choose any combination of products to create bundles, allowing flexibility in offering discounts on related or complementary products.
To create a FBT Bundle follow these steps:
- Navigate to the Bundle & Upsell Section.
- Select ‘Create Bundle’.
- Open the Create Bundle form.
- Enter the Bundle name.
- Provide a Short description for the bundle.
- Add the Product that you want to include in the bundle.
- Apply the Discount.
- Click on ‘Save’.
You can easily create bundles by selecting the products you want to combine and setting a discount percentage, or fixed amount for the bundle.
We’re not handling fixed-off discounts at the moment, but we plan to include them in a future release.
The FBT Bundle feature allows you to create product bundles with discounts when customers buy multiple items together. This encourages customers to add more products to their cart.
Yes, the FBT bundle feature is compatible with most Shopify themes, including those customized for your store.
We will reply within 24 Hrs.
Our support team is available 24/7. Just describe the problem, and we’ll work quickly to solve it for you. We have email support.
Please click on below link:
Absolutely! We’re eager to hear your needs and can quickly add custom features to the OSCP Bundle & Upsell App. Get in touch, and let’s discuss how we can help.
No, shopify discounts will apply.
No, as per now we are not handling any kind of discount features which are applied to Frequently Bought Together products.
Yes, Shopify default discount codes work at the checkout page with Frequently Bought Together products.
If the inventory of a product is insufficient, and when multiple ‘frequently bought together‘ products are added to the cart on the product page, continuously adding three or more products when one of them has insufficient inventory will trigger an error message. This message will specify the particular product item with insufficient quantity.
Out of stock products will not display on the FBT section in the product page.
No, We are not handling Import/Export. It will be handled in the Future release.
No, Our app handles only simple products and the first variant of the product.
We are providing a template for Frequently Bought Together products on product page
The steps you need to follow:
1. Navigate to the ‘Online Store‘ section of your store, then go to the Customize section of your theme.
2. On the site preview on the right, navigate to any of your product pages until you have a ‘Add sections‘ displayed on the menu on the left.
3. Click on the Add block and select the Frequently Bought block inside the app section.
4. Click on the save button on the top right corner.
You can also drag and drop a Frequently Bought block as per your requirement.
We are having one widget as of now that is Frequently Bought Together. For Customization Contact Us
No, we are providing our customized add to cart button with our Frequently Bought Together products on the Product page.
We would like to explore this too. Please reach out to our support and let us know your requirements. We’ll be glad to help.
Title heading text can be updated from Shopify admin, Click on Sales Channel → Online Store → Customization → In Home Page drop down select Products → Click on Default Product → In APPS click on Frequently bought block → Add Frequently Bought Together Title → click on Save button on the top right corner.
To Enable/Disable Frequently Bought Together section you need to follow below steps:
Manual Process
To Enable/Disable you have to go to Bundle → Upsell App Dashboard, then go to FBT Widget → Click Enable Block → Redirected to the theme editor page → Drag the app block up or down to move it to the position you want. → click on the Save button on the top right corner.
For the offer widget to visible in the product page, the following steps are required:
1. The app has to be enabled.
2. The product page you are viewing should have a corresponding offer setup.
3. The widget(section) position should be set up correctly.
To assign Frequently Bought Together products from the product admin page:
Go to Products in shopify admin → Click on Product in which you want to apply a Frequently Bought Together → Scroll down the product page you will see the App Block section In which you have to click on + App Block and then select Frequently Bought Together → Click on ‘Input search and assign FBT products → Click on the Add button → Click ‘Save’ to update the FBT products.
- In Shopify Admin Navigate to the Bundle & Upsell App.
- Select Frequently Bought Together.
- Click on Create FBT.
- Add products you wish to assign Frequently Bought Together products.
- The form will appear with the main product; click on Assign More FBT Product.
- Add Frequently Bought Together products to the main product, then save the changes.
Offer Display:The Frequently Bought Together offer will now be created and displayed on the product page of your store for customers to see.
Yes, if we have done custom changes on your store’s App. You might need to re-configure the app only if the theme is changed.
Yes, you can disable the App from Settings.
Yes , the App supports Shopify 2.0 Themes. In case there are some custom changes on your store, you can make App compatible with simple changes in App embeds.
The Frequently Bought Together app boosts average order value by recommending complementary products, increasing cross-sell opportunities.
Content marketing provides valuable information related to supplements, which can attract and engage potential customers, improve SEO, and establish your brand as an authority in the industry.
Social media marketing promotes your products through platforms, engaging with your audience, and driving traffic to your store through targeted ads and organic posts.
SEO (Search Engine Optimization) improves your store’s visibility on search engines, helping you attract more organic traffic and potential customers actively searching for supplements.
If there are two offers applied, one from Product and one from Variant tier pricing then Variant tier pricing will be displayed.
First you Need to configure Email Notification Setup. You need to follow the below steps.
On the app’s navigation, there’s a tab of Email Notification Setup to configure the emails notifying your customers of account approval.There’s configuration to notify you of new registration too.
In the Notification section, store owners can input their email addresses to receive all communications. Click on Configure Here we will provide three email templates
1. Customer’s Request Submitted Notification: When a customer submits their form, an email is automatically sent to them, informing them that “Your account is under review.”
2. Owner’s Request Received Notification: Likewise, an email is sent to the store owner, informing them that a potential customer has submitted the form along with the customer’s details.
3. Customer’s Approval Notification: Once the form has been reviewed and the store owner changes the customer’s status from pending to approved, another email is sent to the customer.
Step 1: Locate the Main menu in storefront
- From the Shopify admin page, click to Online stores>Navigation
- From the Navigation page, click Main menu
Step 2: Add the form to the menu in storefront
- Once you are in Main menu, click on Add menu item
- Add menu item popup will open in right hand side
- Fill the name and add the link by punching in the Registration Form Setup. You can copy your Registration form link from here (Dashboard > Registration Form Setup). Now You can view the Registration Form in the Frontend menu section.
On the app’s left navigation, click on “Registration Form Setup” and then click on “Create New Form.” The registration form will appear.
Step 1 : Add Title & Description
Step 2 : Add Primary Contact Details
When you click the pencil icon to edit, you’ll see options for Label, Hint, and Validation. Here, you can modify the label, hint, and validation type so that they appear in the frontend form.
Step 3 : Add Business Details
- You need to click on the right side section checkboxes provided in the business details.
- Once clicked, it will allow you to add details for those particular fields.
- You can rearrange the fields by clicking the up and down arrows.
- When you click the pencil icon to edit, you’ll see options for Label, Hint, and Validation. Here, you can modify the label, hint, and validation type so that they appear in the frontend form.
Step 4 : Add More Details
In this section, you can add additional details with custom fields. You can select them according to your preferences.
To avoid pricing grid on product page and directly display discounted price,
follow these steps:
Theme Setup (Left Navigation in App) → Select Theme (click on Continue) → App Block Setup → Click on Add Discounted Price → Move Discounted Price below default Price block → Disable Wholesale Price (Grid) → Save changes
In Shopify admin, click Sales Channel → Online Store → Customization → App Embeds → Click on Wholesale Price
Enter element ID or Class of the following Line Item:
For Add to Cart button
HTML reference for Add to cart button on the Product page (ID or class) in Add To Cart button input box
In Shopify admin, click Sales Channel → Online Store → Customization → App Embeds → Click on Wholesale Price
Enter element ID or Class of the following Line Item:
For Checkout button on Cart Page and Cart Drawer
HTML reference for Checkout button on the Cart Page and Cart Drawer (ID or class) in Checkout Button input box
In Shopify admin, click Sales Channel → Online Store → Customization → App Embeds → Click on Wholesale Price
Enter element ID or Class of the following Input boxes
In Shopify admin, click Sales Channel → Online Store → Customization → App Embeds → Click on Wholesale Price
Enter element ID or Class of the following Input boxes
1. Extension setup:
In Shopify admin, click Sales Channel → Online Store → Customization → App Embeds → Enable Custom Price Grid
2. Block Setup:
In Shopify admin, click Sales Channel → Online Store → Customization → In Home Page drop down select Products v Click on Default Product → In Product information click on Add block → In APPS click on Custom Price Grid → Drag and drop Custom Price Grid below Price (in Product information)
3. Check Dashboard if App is Enabled (ON)
4. The Offer / Discount created is Enabled (ON) On Offer List Page
5. If any other Price related App is installed, it may conflict with our App. So you can disable other pricing related Apps in order to view the Wholesale Table on the product page.
On App Dashboard, Click on Create Offer Tab Mention Offer Name, Offer Details (Wholesale Pricing) Apply discount to Selected Products or Selected Collections Assign discount to Customer Groups
1. All Customers
2. Logged in Customers
3. Customers with Specific Tags
On App Dashboard, Click on Tiered Pricing for Variants, New tab will open to select product, Select products and click on Add button, Here you can apply Wholesale pricing to each Variants based on Customer Tags
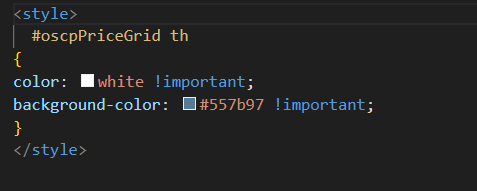
Go to Sales Channel → Online Store → Edit Code → Assets → Theme CSS file
Add the below code at the bottom of .css file:
Yes, this app is compatible with other Payment Gateways.
Yes, you have the option to showcase the discounted price for a single quantity and eliminate the price grid.
Yes, “BUY NOW” button is supported.
The Collection with Offer which is displayed on Top in “List of Offers” will be applied. Then the next Collection Offer that is in the list will be applied.
Example:
Silk Summer Top is in collection “New Collection” (Buy 2 for 5% Off) and “Clearance Sale” Collection (Buy 2 for 10% Off). If “New Collection” is displayed first in “Offer List” then Silk Summer Top will display (Buy 2 for 5% Off) on the product page.
You can simply drag and drop “Clearance sale” on Top of the offer list and (Buy 2 for 10% Off) will be displayed on the Product page.
In this case Variant will have the highest priority over product and collection. That means the Tier price offered at variant level will be displayed on the Product Page.
Example:
Offer 1: Buy 2 for 5% off – White Floral Top (Variant offer)
Offer 2: Buy 5 for 5% off – Floral Top (Product offer)
Offer 3: Buy 10 for 5% off – Tops collection (Collection offer)
Offer 1 will be applied as its Variant level offer which has highest priority.
Yes, tier pricing will work when placing an order through Shopify admin.
Yes, tiered pricing for Product variants is available with Customer Tags.
Yes, you can apply discounts at product level based on customer tags.
Example:
Selected Products can be offered Tier Price – Buy 10 for 50% Off and assign to Wholesale customer Tag.
Yes, you can apply a discount at the collection level based on the customer tag.
Example:
Products in “New collection” can be offered Tier Price – Buy 2 for 10% off and assign this to customers with Tag (VIP).
We will reply within 24 Hrs.
Our support team is available 24/7. Just describe the problem, and we’ll work quickly to solve it for you. We have email support. Please click on below link :
https://www.oscprofessionals.com/custom-pricing-wholesale-app-contact-us/
Absolutely! We’re eager to hear your needs and can quickly add custom features to the OSCP Wholesale App. Get in touch, and let’s discuss how we can help.
The Collection with Offer which is displayed on Top in “List of Offers” will be applied. Then the next Collection Offer that is in the list will be applied.
In this case Variant will have the highest priority over product and collection. That means the Tier price offered at variant level will be displayed on the Product Page.
Yes, the app is compatible with default shopify discounts.
Yes, wholesale account form is available on the website. You can offer tier pricing to customer groups / tags using App.
Tier pricing will be affected if we have done custom changes on your store’s App. You might need to re-configure the app only if the theme is changed.
Yes, App supports Shopify 2.0 Theme. In case there are some custom changes on your store, you can make App compatible with simple changes in App embeds.
Using a Shopify app like Wholesale App for quantity breaks, allows you to implement a tiered pricing strategy effortlessly. This means you can offer discounts that increase with the order size, incentivizing larger purchases.
By Default shopify does not provide tier pricing & customer group ( tag ) based pricing which is a requirement for a wholesale store. Using our app your store becomes a wholesale store.
Yes, BUY NOW button is compatible with the App.
Looking for custom Shopify app development? We can develop the ideal app for your store. Contact us to get started!
The Collection / Offer which is displayed on Top in “List of Offers” will be applied.
Then the next Offer / Collection that is in the list will be applied.
In this case Variant will have the highest priority over product and collection. That means Tier price offered at variant level will be displayed on the Product Page.
To create Customer Groups, follow these steps:
1. Navigate to the Customer Group.
2. Enter the Customer Group name and save it.
3. Next, assign customers to the created group.
Note: Ensure to save the group before adding customers to it
For managing a specific group:
1. Access the settings.
2. Select the manage option for the desired customer group.
3. The Customer Group Editor form will appear, allowing you to edit customers assigned to that group.
Unfortunately no, at this time our app only supports adding widgets to pages controlled by your theme. The Checkout page/flow is outside our control.
1. Extension setup:
In Shopify admin, click Sales Channel → Online Store → Customization → App Embeds → Enable Discount Price
2. Block Setup:
In Shopify admin, click Sales Channel → Online Store → Customization → In Home Page drop down select Cart → Click on Cart → In Template under the Apps section click on Add block → In APPS click on Custom Cart Items
3. Check Settings if App is Enabled (ON)
4. If any other Price related App is installed, it may conflict with our App. So you can disable other pricing related Apps in order to view the Discount Widget Table on the product page.
A quantity discount based on collections allows you to offer discounts to customers who purchase multiple items from specific collections in your store.
Please check how many discounts are created in the discount section. There’s a limitation that allows only 25 active discounts to be created. If there are more than 25 discounts, kindly deactivate or delete some of them before attempting to define a label again.
Currently, our app does not support multi-currency functionality. You can contact us for any custom requirement.
1. Extension setup:
In Shopify admin, click Sales Channel → Online Store → Customization → App Embeds → Enable Discount Price
2. Block Setup:
In Shopify admin, click Sales Channel → Online Store → Customization → In Home Page drop down select Cart → Click on Cart → In Template under the Apps section click on Add block → In APPS click on Custom Cart Items
3. Check Settings if App is Enabled (ON)
4. If any other Price related App is installed, it may conflict with our App. So you can disable other pricing related Apps in order to view the Discount Widget Table on the product page.
Volume Discounts are discounts offered to customers who purchase a specific quantity of a product. These discounts are designed to incentivize customers to buy more of a product by offering them a lower price per unit when they purchase a larger quantity.
Customer Groups are groups of customers who have similar characteristics, needs, and preferences.
Yes, you can apply a discount based on the total number of items in the cart by selecting the “Total Order Quantity” option under the “Discount Conditions.”
Amount OFF Discount: This type of discount subtracts a fixed amount of money from the total price of the product or order.
For example:If a product costs $100 and you apply a $20 discount, the price after the discount will be $80.
Fixed Price Discount: This type of discount sets a specific price for the product or order, regardless of the original price.
For example: If a product usually costs $100 and you set a fixed price discount of $70, the price of the product will be $70 regardless of any other factors.
Percent OFF Discount: This type of discount applies a percentage reduction to the original price of the product or order.
For example:If a product costs $100 and you apply a 20% discount, the discount amount would be $20, and the price after the discount would be $80.
1. Extension setup:
In Shopify admin, click Sales Channel → Online Store → Customization → App Embeds → Enable Discount Price
2. Block Setup:
In Shopify admin, click Sales Channel → Online Store → Customization → In Home Page drop down select Cart → Click on Cart → In Template under the Apps section click on Add block → In APPS click on Custom Cart Items
3. Check Settings if App is Enabled (ON)
4. If any other Price related App is installed, it may conflict with our App. So you can disable other pricing related Apps in order to view the Discount Widget Table on the product page.
1. Extension setup:
In Shopify admin, click Sales Channel → Online Store → Customization → App Embeds → Enable Discount Price
2. Block Setup:
In Shopify admin, click Sales Channel → Online Store → Customization → In Home Page drop down select Products → Click on Default Product → In Product information click on Add block → In APPS click on Quantity Selector Widget → Drag and drop Custom Price Grid below Price (in Product information)
3. Check Settings if App is Enabled (ON)
4. If any other Price related App is installed, it may conflict with our App. So you can disable other pricing related Apps in order to view the Discount Widget Table on the product page.
We will reply within 24 Hrs.
Our support team is available 24/7. Just describe the problem, and we’ll work quickly to solve it for you. We have email support. Please click on below link :
When a rule is applied to both an app and a shopify default discounts Whichever is higher is applied to that product.
Absolutely! We’re eager to hear your needs and can quickly add custom features to the OSCP Pricing & Discount Suite App. Get in touch, and let’s discuss how we can help.
Yes, When cart contains a tier priced product then Shopify discount code can be applied on Cart and Checkout. In case carts contain a tier priced product and Shopify discount code is applied on product level then the higher one will be applied.
Yes, you can set different discount rates based on the quantity purchased within the same collection. For example, you could offer a 10% discount for 3 items and a 20% discount for 5 items.
When a product has Variant Rules, Product Rule and Collection Rule applied then the higher one gets applied.
When a rule is applied to both a product and a collection, the higher value is applied to that product. However, on the product page, both the Product and Collection widgets are displayed
When a rule is applied to both a variant and a collection, Whichever is higher is applied to that product
When both a Variant Rule and a Product Rule are applied to the same product, the rule with the higher value takes precedence.
Yes , Shopify discounts work with our app.
Yes , shopify manual order work with our app.
By Default shopify does not provide tier pricing & customer group ( tag ) based pricing which is a requirement for a wholesale store. Using our app you store becomes a wholesale store.
Please check how many discounts are created in the discount section. There’s a limitation that allows only 25 active discounts to be created. If there are more than 25 discounts, kindly deactivate or delete some of them before attempting to define a label again.
Yes, App supports Shopify 2.0 Themes. In case there are some custom changes on your store, you can make App compatible with simple changes in App embeds.
Tier pricing will be affected if we have done custom changes on your store’s App. You might need to re-configure the app only if the theme is changed.
No, It will not work with draft order.
Customer Groups are groups of customers who have similar characteristics, needs, and preferences.
Yes, our app is compatible with shopify’s default discounts. But if discounts are applied on products the higher one will be displayed.
Volume Discounts are discounts offered to customers who purchase a specific quantity of a product. These discounts are designed to incentivize customers to buy more of a product by offering them a lower price per unit when they purchase a larger quantity.
1. Extension setup:
In Shopify admin, click Sales Channel → Online Store → Customization → App Embeds → Enable Discount Price
2. Block Setup:
In Shopify admin, click Sales Channel → Online Store → Customization → In Home Page drop down select Products → Click on Default Product → In Product information click on Add block → In APPS click on Quantity Selector Widget → Drag and drop Custom Price Grid below Price (in Product information)
3. Check Settings if App is Enabled (ON)
4. If any other Price related App is installed, it may conflict with our App. So you can disable other pricing related Apps in order to view the Discount Widget Table on the product page.
1)Extension setup:
In Shopify admin, click Sales Channel => Online Store => Customization => App Embeds => Enable Discount Price
2) Block Setup:
In Shopify admin, click Sales Channel => Online Store => Customization => In Home Page drop down select Products => Click on Default Product => In Product information click on Add block => In APPS click on Quantity Selector Widget => Drag and drop Custom Price Grid below Price (in Product information)
3) Check Settings if App is Enabled (ON)
4) If any other Price related App is installed, it may conflict with our App. So you can disable other pricing related Apps in order to view the Discount Widget Table on the product page.
Yes, When cart contains a tier priced product then Shopify discount code can be applied on Cart and Checkout. In case carts contain a tier priced product and Shopify discount code is applied on product level then the higher one will be applied.
Currently, our app does not support multi-currency functionality. You can contact us for any custom requirement.
1. Extension setup:
In Shopify admin, click Sales Channel → Online Store → Customization → App Embeds → Enable Discount Price
2. Block Setup:
In Shopify admin, click Sales Channel → Online Store → Customization → In Home Page drop down select Cart → Click on Cart → In Template under the Apps section click on Add block → In APPS click on Custom Cart Items
3. Check Settings if App is Enabled (ON)
4. If any other Price related App is installed, it may conflict with our App. So you can disable other pricing related Apps in order to view the Discount Widget Table on the product page.
Unfortunately no, at this time our app only supports adding widgets to pages controlled by your theme. The Checkout page/flow is outside our control.
- Amount OFF Discount: This discount type offers a fixed amount off the original price. For example: If the retail price of the item is $100 and you apply a ” $20 Amount Off” discount, customers will receive the final price as $80.
- Percent OFF Discount: This discount type provides a reduction based on a percentage of the original price. For example: If the retail price of the item is $100 and you apply a ” $10 Percent Off” discount, customers will receive the final price as $90.
To create Customer Groups, follow these steps:
Navigate to the Customer Group.
Enter the Customer Group name and save it.
Next, assign customers to the created group.
Note: Ensure to save the group before adding customers to it
For managing a specific group:
Access the settings.
Select the manage option for the desired customer group.
The Customer Group Editor form will appear, allowing you to edit customers assigned to that group.
Yes, Shopify default discount codes work at the checkout page with Frequently Bought Together products.
No, as per now we are not handling any kind of discount features which are applied to Frequently Bought Together products.
Yes, App supports Shopify 2.0 Themes. In case there are some custom changes on your store, you can make App compatible with simple changes in App embeds.
Yes, if we have done custom changes on your store’s App. You might need to re-configure the app only if the theme is changed.
We prioritize clear communication and building trust. Get in touch with our expert manager, Ankit Shrivastava, to discuss your needs and tailor a solution for your Shopify store’s success.
Feel free to reach out! We’re here to answer any questions and help you unlock the full potential of your Shopify website.
Remember, with a fast and optimized store, you’ll leave your customers with a positive experience and watch your conversions soar.
Yes! We offer convenient online payment options through PayPal, Payoneer, and Wire Transfer.
We leverage leading industry tools like PageSpeed Insights, Gtmetrix, and Lighthouse for comprehensive site speed analysis. Additionally, we use tools like Photoshop for image editing and TinyPNG for image compression.
We’re confident in our abilities! We offer a 100% satisfaction guarantee on improvements based on our chosen package. Our proven track record speaks for itself, evidenced by our consistently high customer retention.
Absolutely not! We pride ourselves on in-house expertise. Our team of highly skilled and certified professionals handle every aspect of your project, ensuring consistent quality and alignment with your expectations.
We’re available for your convenience Monday-Friday, 9:00 AM to 9:00 PM IST. We can flex our schedules for additional communication needs in specific cases.
We offer two tailored packages, Basic and Platinum, to cater to your specific needs. You can find detailed pricing and plan specifications on our website:
We look at various optimization opportunities and use various speed optimization techniques to resolve them.
Some of the most important activities we do are
- Upgrade theme : Communicate with app providers, if their apps are resulting in speed issues and get those resolved. If app providers are not able to resolve then we suggest alternate apps or customization approaches get the optimization issue sorted.
- We handle cumulative layout shifting by working on HTML, CSS, and JS.
- For images payload, we use lazy loading to defer offscreen images and also see if we have the option to apply picture tags for responsive images.
- We remove or defer JS if possible using some advanced front-end techniques.
- We handle the font visibility aspect using the swap technique.
- We also remove unwanted CSS
- The overall goal is to pass websites plus improve website speed score.
We’re happy to share success stories! With high customer retention rates, we’re confident our clients can vouch for our expertise. We can connect you with references based on your specific needs and industry.
Bitcoin can be practical for daily spending, depending on the merchant. Large online retailers that accept Bitcoin often have streamlined integrations that make the variety of things you can buy with Bitcoin wider. However, Bitcoin payments are not yet ubiquitous at local brick-and-mortar stores. As more merchants adopt Bitcoin payments, retail usage for daily spending will likely become more common.
Paying with Bitcoin can provide more privacy compared to credit cards or bank transfers since no personal information is required to send Bitcoin. All that is needed is the recipient’s public wallet address. However, Bitcoin transactions are recorded permanently on the blockchain, though wallet owners remain anonymous. So, Bitcoin provides pseudo-anonymity but not complete privacy.
There are a few key reasons to consider purchasing with Bitcoin. Bitcoin allows buying goods without sharing personal financial information like with a credit card. It avoids the possibility of payments being denied or held for fraud review when using a card. Bitcoin enables quick payments and faster checkout without bank delays. And paying directly with Bitcoin means not missing out on any price gains if converting back to fiat.
Bitcoin’s volatile price swings do carry risks when paying directly in Bitcoin. The value of Bitcoin can change quickly in the time between a purchase and when the merchant receives the payment. Merchants often use payment processors to mitigate this exchange rate risk. In some cases, making smaller everyday purchases with Bitcoin may be less risky than high-value purchases.
Paying with Bitcoin can be very advantageous for buying goods and services abroad. International credit card transactions often incur extra fees and exchange rate markups. Banks also frequently charge hefty fees for international wire transfers. Bitcoin enables quick, low-cost, cross-border payments without intermediaries. This gives consumers more access to foreign goods.
Indicators show that adoption is growing, and there are more and more things you can buy with Bitcoin, such as major companies adding support for Bitcoin transactions, more merchants signing up for crypto payment processing services, and increased consumer interest and discussions about spending Bitcoin. According to payment processors, Bitcoin payment volume is growing year-over-year as more businesses accept it.

Currently, our app does not support multi-currency functionality. We apologize for any inconvenience this may cause.
Tier pricing is calculated on the product”s “Sale Price” (not the compare-at-price).
By optimizing their website for relevant keywords, pharma companies can rank higher in search results and be discovered by their target audience. A well-designed, informative website conveys expertise and establishes the brand as an authority. SEO also aids in getting press mentions and backlinks from reputed healthcare sites, further boosting trust.
HIPAA regulations prohibit the disclosure of a patient’s health information without consent. This makes it difficult for pharma content creators to use patient stories or real-world examples to make their content more engaging. They need to be very compliant and avoid making claims about cures, treatments, etc. without disclaimers.
Thorough keyword research ensures pharma brands are optimizing for terms prospects are actually using when searching for drugs and treatments online. This leads to higher click-through rates. Identifying low-competition long-tail keywords also helps brands rank better. Effective keyword optimization is key to SEO success.
Startups should set aside at least 10-20% of revenue for marketing from inception. Budgets can then be allocated to platforms based on goals. For awareness, social media gets priority. For lead generation, SEO and PPC take precedence.
These agencies offer tailored strategies based on the nuances of the Dubai market. Their expertise provides startups with a competitive edge in a crowded digital landscape.
Platform analytics dashboards provide real-time campaign performance data. Tracking metrics like impressions, clicks, leads, and sales allows startups to connect marketing efforts to actual ROI.
The main purpose of UI/UX is to break down complex information for easy understanding. It makes user habits and satisfaction the main focus which in turn increases your product reputation.
Yes, UX and marketing can work together towards the same goal which is to generate revenue.
The simple answer is No. If there’s no user experience, there is no digital marketing.
Yes, you can perform SEO on Shopify stores by optimizing various on-page and off-page elements, creating high-quality content, improving user experience, and implementing other SEO best practices to increase your store’s visibility in search engines and drive organic traffic to your website.
The decision to pay for SEO services on Shopify depends on several factors, including your budget, goals, and the competitiveness of your industry. While it’s possible to perform SEO on your Shopify store yourself, hiring a professional SEO agency or expert can offer several benefits that may be worth the investment.
Paid SEO may be more suitable for businesses that have the budget and want to achieve faster results and have more complex SEO needs, while free SEO may be more appropriate for businesses with limited budget and resources, and are willing to invest more time and effort in learning and implementing different SEO strategies.
On Dashboard, Click on Create Offer Tab
Mention Offer Name, Offer Details (Tiered Pricing)
Apply discount to Selected Products or Selected Collections
Assign discount to Customer Group:
- All Customers
- Logged in Customers
- Customers with Specific Tags
Video Tutorial
- On Dashboard, Click on Tiered Pricing
- New tab will open to select product
- Select the product and click on Add button
- Here you can apply Wholesale pricing to each Variant
Video Tutorial
- On Dashboard, Click on Create Offer Tab
- Mention Offer Name, Offer Details (Tiered Pricing)
- Apply discount to Selected Products or Selected Collections
- Assign discount to Customer Group:
Customers with Specific Tags
(Create a new customer Tag and assign same Tag to customers)
Video Tutorial
Please ensure basic App Setup is complete, watch the below video for more details:
Video Tutorial
For any assistance, Email us at support@oscprofessionals.com
In Shopify admin, click Sales Channel => Online Store => Customization => App Embeds => Click on Custom Price Grid
Enter element ID or Class of the respective Line Items
For any assistance, Email us at support@oscprofessionals.com
In Shopify admin, click Sales Channel => Online Store => Customization => App Embeds => Click on Custom Price Grid
Enter element ID or Class of the following Line Item:
- For Add to Cart button
HTML reference for Add to cart button on the Product page (ID or class) in
Add To Cart button input box
Example: .product-form__submit
In Shopify admin, click Sales Channel => Online Store => Customization => App Embeds => Click on Custom Price Grid
Enter element ID or Class of the following Line Item:
- For Checkout button on Cart Page and Cart Drawer
HTML reference for Checkout button on the Cart Page and Cart Drawer (ID or class) in
Checkout Button input box
Example: #checkout , #CartDrawer-Checkout
No, Orders placed from Shopify Admin are not currently eligible for Tiered discount.
Yes, App supports Shopify 2.0 Themes. In case there are some custom changes on your store, you can make App compatible with simple changes in App embeds.
Yes, you can apply % discount or fixed price on your sale price as per qty and customer tag.
Example: Products in “New collection” can be offered Tier/Tiered Price – Buy 2 for 10% off and assign this to customers with Tag (VIP).
Yes, you can apply % discount or fixed price on your sale price as per qty and customer tag.
Example: Selected Products can be offered Tier/Tiered Price – Buy 10 for 50% Off and assign to Wholesale customer Tag.
No, customer tags are presently not supported. If you want to give customer tag based tiered pricing then we recommend to use product or collection based tiered pricing interface.
In this case Variant will have the highest priorty over product and collection. That means Tier price offered at variant level will be displayed on Product Page.
Example: Offer 1: Buy 2 for 5% off – White Floral Top
Offer 2: Buy 5 for 5% off – Floral Top
Offer 3: Buy 10 for 5% off – Tops collection (including Floral Top)
Offer 1 will be applied as its Variant level offer which has highest priority.
The Collection / Offer which is displayed on Top in “List of Offers” will be applied. Then the next Offer / Collection that is in the list will be applied.
Example: Silk Summer Top is in collection is in “New Collection” (Buy 2 for 5% Off) and “Clearance Sale” Collection (Buy 2 for 10% Off).
If New Collection is displayed first in “Offer List” then Silk Summer Top will display (Buy 2 for 5% Off) on product page.
You can simply drag and drop Clearance sale on Top and (Buy 2 for 10% Off) will be displayed on Product page.
If an Offer Rule is disabled then the next Offer which is in the “List of Offers” will be applied.
Yes, you can disable Offers on Products and Collections.
Yes, you can diable the App from Dashboard
If a Tiered Pricing for Variant level is applied, that is displayed on priority. Just delete it. Then the Collection level tier pricing will be displayed.
No, When cart contains a tier priced product then Shopify discount code cannot be applied on checkout. In case cart do not have tier pricing products then Shopify discount code can be applied on Checkout.
No, “BUY NOW” or “Buy it now” button is not supported.
Tier pricing will be affected if we have done custom changes on your store’s App. You might need to re-configure the app only if the theme is changed.
No, currently tiered pricing is not displayed on Collection page.
No, wholesale account form is not available on the website. However, you can offer tier pricing to customer groups / tags using App.
Our experts understand SEO and we have a process defined to minimize the impact on SEO. Rather with Shopify in-built features, you can see an upside to your SEO if migration is handled with SEO in mind.
Your data will be completely secure during Shopify migration.
Few hours. We generally do the final migration during off-peak hours.
Depending on your needs, the price of our Shopify migration services will vary. To find out more, contact our Manager. It also depends on what all you want to migrate and how much data with each entity.
You have to install application from playstore and you can start using it. No need to register and no trial period. Free application with complete sales activities as below.
– Add your products or or Bulk data by using CSV file.
– Add your Customers and Vendors/Suppliers manually or Bulk data by using CSV file.
– Now you can create Sales and Purchase Order by clicking on that icon.
– Share order as text, PDF and Excel to customer and vendor
– Share Multiple Order in PDF
– Edit, Copy and Delete Order, product, customer and vendor
– Manage inventory/stock
– Payment followup for reminder to receive payament from customer
– Import and export orders and share multiple order with your boss.
– keep bacup of your data for safe your yaor data
– Low stock, Backup and order delivery alert.notification on mobile
– Create Purchased order from sales order
– Custemize app as per your business needs from settings
– Helps with some other sales activities like Reports, Sales Visite plan, Commisssion and Broker.
– After installing application when you open app, you will see dashboared screen.
– On dashboard, You will see Sales and Purchase icon.
– To create sales and purchase order, first add product and party name.
Sales Order :
– There are three separate sales order forms under Sales >> Order form.
– User can use any order form as per their business need.
– Select customer and add product on order form, Also user can add Tax, Discount, shipping, addotional charges and additional information, any image attachment and delivery date as per need in order and save it to create order.
– Record order as delivered.
– After order created, you can share it with customer/party in Text, PDF, Excel or can print order and provide receipt.
– If user want to create order but temprary its on hold,or in case of Estimation/quotation then user can use order draft feature by clicking on “+” icon on order form.
– This created order pending payment can be added in payment followup under account section.
Purchase Order :
– There are two purchase order form under purchase >> PO form.
– Also you can create PO from Sales order directly.
– User can create order and share message with supplier to purchase item.
Note: You can customize order configuration from settings like show firm detail in order message, configuration, Currency, order message, PDF configuration, Inventory configuration.
– There are 3 easy steps to start using it.
1. Install App.
2. Add or Import Customers.
3. Add or Import Products.
There is no registration required to use the app.
Required Plugin:
Download wordpress and configured it with woo-commerce
API Plugin’s for the application. You need to install this plugin’s to your Web Portal (WordPress).
Note: To download this plugin’s visit the below URL
Sales Assist order integration with woocommerce Plugin’s :
https://oscprofessionals.com/salesAssist/Woocommerce-SalesAssist.zip
How to configure:
A) Web Portal End:
Go to wordpress dashboard
Go to woocommerce > Settings > Advanced > REST API > Enter details with READ & WRITE permission > Click on Generate API key
Then you can see Consumer Key & Consumer Secret Key.
B) Android Application end:
Go to Android application, Then click on woo-commerce plugin icon on dashboard,
To add connection, You need to enter your store URL with Generated Consumer Key & Consumer Secret Key
Also you can scan it by QR code
Save Connection
And Use it to upload orders on web portal
How to use:
Import Product and Customer from Woo-Commerce and import to app through csv, but format should be the same which is used in app
ex. SKU of product from woo-commerce replace with product code in csv of product or while adding product manually
You have to do same with customer csv as well.
Customer id of customer from woo-commerce replace with customer code in csv of customer or while adding customer manually.
From order List page you can upload Multiple Order by Long click on any order.
Then upload orders by click on upload order icon.
Note:
Tax order can not uploaded. Only Standard and Inventory order uploaded.
Edit price will not reflected in admin of Woo-commerce.
Today, a whopping 50 times daily, on average, a website is targeted. A compromise on your website may be a catastrophic and expensive experience, which could potentially damage visitors, sales and credibility. Security on the website is important to protect the website and visitors. And it’s easy to start at an affordable price!
Click here to protect your site today.
It’s a common misconception that hosting providers protect each website they host. The reality is, your web host only protects the server your website is hosted on, not the website itself. Think of it like securing an apartment building. Property management takes responsibility for securing the building, but each tenant must lock the door to their own apartment.
We guarantee we’ll do everything within our power to keep the website safe. In security, there is no 100% solution. While we’re highly effective, there are various variables we cannot account for (i.e., the website owner, the web server environment).
Example: if an attacker discovers your admin passwords, or if your website is infected from the back end (server cross-contamination or compromise). You should also ensure that you have set a rule to prevent Firewall bypass in your .htaccess in case someone knows your website’s IP address.
Steps:
Step 1: Download Business Assist GST Woocommerce API plugin from https://dev.oscprofessionals.com/wordpress-plugin/business-assist-GST
Step 2: Install and configure it with your WordPress woocommerce store
Step 3: Download Business Assist app from Google Play store
Step 4: Take URL and Key from WordPress admin and add to Business Assist app
Step 5 :User can login in mobile by selecting one of users details from admin
Step 6: You are ready to use!
Steps:
– Download Distribution and Retail management app from playstore.
– When you open app, app ask for CS and CK key, which we will get from Admin section.
>> From left menubar of admin >> Select woocommerce setting >> Click on Addvanced section >>Rest API>>Add key >> Now add detail and click on Genarte API Key>> now enter this key in mobile and add store URL >> Click on OK.
– Login by user mail Id and password which provided by admin.
>>From left menu bar select users/create new user >> Provide details to executive to login from app.
– Now, app is ready to start using multiple users with different user roles and permissions from WP backend.
– After installation of app when you open it, One screen will open.
– Here by adding credential user can login to check live application if having WP backend.
Or
– If user not having backend then, click on ” Click here to check demo” at footer of the screen. So you will get Application demo.
Or
– If you want to check App demo with Backend then contact us on Support@oscprofessionals.com.
– Yes, You can mange all the business activity using this app.
This app usefull to
– Manufacture
– Distributor
– Vendors
– Sales Executive
– Stockist
– On product list screen, click on sync icon from header toolbar.
– On customer list screen, click on sync icon from header toolbar.
So, now your product and customer will download in application from webportal and app ready to take orders.
Steps:
– You can take orders from mobile using order form and upload to admin.
– if your mobile connected to internet then order will upload automatically to admin.
– If your device not connected to internet then order will save in mobile with open status, once you have connected to internet order will upload automatically to admin and status will change.
– User can view status of orders from order list.
– Order will edit till it upload to admin.Once it uploaded you can not edit it.
– You will get status of your order by clicking on ” sync symbol” on order list.
– You can share order with your customer.
– You can delete multiple order at once by long press on any order.
– you cam share multiple order with customer and boss in PDF format.
– Yes, You can use their mail ID’s and provide passward from web backend to team.
So they can login in app using user ID and Password.
Follow below steps to configure Userid from backend.
– From left menubar in backend, select User >>Add User>> Add username >> Generate and rename password word as per requirement
As above mentions steps create different users and and provide login creadentials to your team to login from app.


– Yes, application “Business Assist -Distribution and Retail Management” uses wordpress backend.
So you can host your own database or we will host database for you.
– No, this is free application. No registration required to use this app and no trial period.
Yes, Business Assist: distribution and retail management which can be connected to wordpress backend.
– Yes, WordPress backend you can manage by using desktop and application you have to use from mobiles.
– Yes Sure, We will definately assist you. Please contact us using support@oscprofessionals.com with your requirement.
Generally we do not provide. But you may raise a request for this by contacting us and we can discuss further.
– Yes, this single application can be used for multiple type of users. Please refer to the user guide.
– You can set different role for your team and also assign permission to access particular features or hide some data.
– You can manage different role and permission from backend. So your team can access only that data which you assign in permission from mobile end.
From left toolbar of admin,
Select users >> User role editor>> select roll from dropdown >> check mark permission which have to assign.

– From left menu bar of Admin Select Location manager.
– Create, Zone, cities and localities of customer.
– Assign localities to executive.
– So while executive download/refresh the customer list to visit, he will see only that customer which area assigned to executive.
– So like this Admin can assign area wise customers to every executive to visit.
– On order form, there is option to change order date and delivery date.

– No need to manually upload order every time. If you have taken orders from your customer and once you have conneted to internet, order will upload to admin.
– When order created, the order status will in “Open” status.
– Once order uploaded to admin, it will automatically convert into “processing”.
– On order list, by clicking on sync icon, the order status will update as per exact order status from admin
– While visiting to customer executive can take order from customer by using Mobile application,
– If product is in stock then executive can take order.
– But if product is out of stock then executive unable to book order without admin permission.
– To allow executive to book order without stock, follow below steps from admin section –
– Click on product, which have to allow for backorders
– Select Inventory section
– Select status “allow” for backorders and click on Update button.
– Now, every executive can book orders and when stock available order can dispatch.
Steps :
– From left menubar of admin, Select tier price section.
– Add Group
– You can edit /delete group from this section.
– Now, click on “assign customer” section.
– Add new customer or click on edit to assign group to customer.

– Now, From product section, select product name which have to apply tier price.
– Click on tier price.
– Select group, enter quantity and add price and update it.
– Now, when order placed from mobile end, Tier price will apply on product price.
Yes, VAT Exempt supports product with custom price.
Yes, VAT Exempt Extension is applicable for orders placed from admin.
Community version: 1.7, 1.8, 1.9, 1.9.2.2
Yes, it support.
– Yes, guest customers can submit quote by filling some mandatory fields of request for a quote form i.e email, name, etc
– Fields can be customized on Checkout to show ‘Tax ID’ field and the ‘Apply Tax-Exempt’ button only. For this, we need to do some changes to module files.
– No, the default module version will not work with mageplaza one step checkout. But we can achieve this by doing customization and make our module compatible with mageplaza one step checkout.
-Yes, we can change the field labels.
-Yes, it is possible to not display these fields during checkout.
– Yes, using our module you can display VAT Exempt declaration form on the cart page. There is a module configuration setting available to on/off display VAT declaration on the cart page.
– Our module allows you to create vat exempted orders from the backend too.
– Yes, our module supports amasty one step checkout but this is a custom solution. Let us know which Version of Amasty checkout is using? We will provide this solution with additional cost.
– Yes, we have a custom solution for this. We will provide this solution with additional cost.
– Yes, our module supports one step checkout but this is a custom solution.Let us know which Version of checkout is using? We will provide this solution with additional cost.
– Yes, it supports a Configurable product. You should set VAT Exempt flag to ‘Yes’ for configurable as well as to its associated simple products.
